Article Series
Introduction
Creating themes for ASP.NET 2.0 is very easy if you follow the standard guidelines Microsoft gives us. Microsoft gives a pretty good discussion in the MSDN article
ASP.NET Themes and Skins Overview. I've read it several times but since I don't do this very often I keep forgetting the simple things. Recently,
I posted a question on ASP.NET forums asking how to have an image automatically come from the correct theme directory. As usual, Dave Sussman
gave me the perfect answer.
"You should store the images under the themes and set the ImageUrl in the skin file. Give the control a SkinID in both the skin file and in the page. When the theme changes the appropriate image will be used."
In this article, I'll basically explain his answer with an example using the code camp web site.
Code Camp Site Structure
The Code Camp project has a very standard directory setup. In Visual Studio 2008, the solution explorer looks like this:
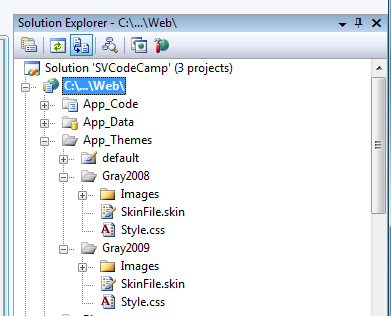
Notice that I have two themes defined, Gray2008 and Gray2009. The reason for this is so when 2009 comes along and we want to change certain images that contain things like the Code Camp Date and Year, we don't have to do surgery on the asp.net pages, but simply change to the new theme and update the files there. This also keeps the code base intact so we don't have to branch our code for next year. All in all, a very clean solution.
The Mechanics of Theme Changing and the Skin Definitions
First, you have simple mention in your web.config file the name of the default theme you will be using. By doing that, it references the correct App_Themes sub directory. Our web.config looks like the following for this year which means we will be using the Gray2009 theme directory.

Second, you need to mention a SkinId in any control you may use. In our case, we want to have the image on the upper right side of the code camp web site display the correct year. That is, on the home page we have something like this:

The tag in the master page looks like this:

Notice the SkinId circled in green. Also notice that there is no ImageUrl defined in this tag. What happens next is that web site will look in the default theme's SkinFile.skin file (see the solution explorer above for this). In the App_Themes/Gray2008/SkinFile.skin file there is a reference that finds the actual image file that will be used. It reference it from the App_THemes/Gray2008/Images directory as follows:

And, that's it! Just by changing the theme in the web.config file, the correct image file will be displayed in the master page. The other nice thing is that design time support works also. You will see in the Visual Studio 2008 Designer the correct image based on where your web.config points.
Conclusion
In this article, we've shown the details of how to have a flexible design that
supports multiple theme files. Something we will use for years and years with
the new Code Camp web site. We also may decide to have different themes for
different types of users. That is, admin's may have a different theme than
normal users. We could also let users pick there own color styles by having
different themes. Lots of possibilities.
I hope this helps you.