Also published on Microsoft’s MSDN Network at Microsoft ASP.NET 2.0 Member/Role Management with IIS, Part 4: Adding Personalization with Profiles to the ObjectDataSource
Applies to:
- Microsoft ASP.NET 2.0
- Microsoft Visual Studio 2005
- Microsoft Internet Information Services
Run Live Demonstration Of Personalization in Membership Technology
Go to the Web Site to Create Your Own ObjectDataSource From Your Own Web.Config
Click Here for Source Code Associated With This Article
Microsoft ASP.NET 2.0 Member/Role Management with IIS, Part 2: Implementation
Contents
Introduction
Background
Why Do We Need This?
Adding Profile Information to the ObjectDataSource
Using the Profile Generating Website
Build A Simple Web Page
Conclusions
Introduction
This article extends one of the web pages developed in Part II of this series using Microsoft's Profile feature. In Part II, the Membership API was encapsulated in an ObjectDataSource. This allowed the developer to have a drop in web page for the web site administrator to use in an web site project for editing membership. This tools allowed for similar capability to the the web site manager tool included in Visual Studio 2005 (VS2005). It is necessary because using that web configuration tool included with VS2005 is problematic and should not be used in a production web site.
This article explains how the encapsulation of Membership can be extended to include Profile (personalization) information for users. The designers of Membership included a very basic set of attributes to associate with Members (logged in users). The Profile API provided by Microsoft allows for additional information to be attached to each member. Typically, this information would include things like: first name, last name, home address, favorite color schemes or anything else the developer may want to associate with a logged in member. By personalizing the site to the member logged in, it likely increases the chance the user will return and be more comfortable while visiting.
Background
ASP.NET has done an outstanding job of making the profile information associated with a logged in user very easy to access programmatically. They have done this by using their Provider technology to create a typed class that the developer can access with intellisense property values. What does this mean? This means that the profile information is declaratively defined as XML in the web.config file. The example below shows the lines that have been added to the <system.web> section of the web.config.
 <system .web>
  <profile defaultProvider="SqlProfileProvider">
    <providers>
      <remove name="AspNetSqlProfileProvider"/>
      <add name="SqlProfileProvider"
       type="System.Web.Profile.SqlProfileProvider"
       connectionStringName="LocalSqlServer"/>
    </providers>
    <properties>
      <add name="FirstName" type="string"/>
      <add name="LastName" type="string"/>
      <add name="AdvancedMode" type="bool"/>
      <group name="Address">
        <add name="Street" type="string"/>
        <add name="City" type="string"/>
        <add name="State" type="string"/>
        <add name="Zip" type="string"/>
      </group>    </properties>  </profile>
</system>
These new properties defined by Microsoft can be accessed in C# at run time very simply. Below are a few lines of code showing how this can be done in a typical codebehind page. These lines of code are taken from the button update event on the page UpdateProfileSimple.aspx included in the download associated with this article.
 protected void ButtonUpdate_Click(object sender,
    EventArgs e)
{
  Profile.FirstName = TextBoxFirstName.Text;
  Profile.LastName = TextBoxLastName.Text;
  Profile.Save();
}
Profile is available everywhere because it is a static class generated from the Web.Config section shown above. Because it is an actual class, the properties FirstName and LastName are available from VS2005's intellisense and are type safe. No incorrectly typing them and getting syntax errors.
In the simple example below (UpdateProfileSimple.aspx), it is necessary to first pre load the textboxes when the user logs in. This can be done in the pageload event as follows.
 protected void Page_Load(object sender, EventArgs e)
{
  // Only allow for profile update when a user is logged in
  MembershipUser mu = Membership.GetUser();
  if (mu == null)
  {
    ButtonUpdate.Enabled = false;
  }
  else
  {
    if (!IsPostBack)
    {
      TextBoxFirstName.Text = Profile.FirstName;
      TextBoxLastName.Text = Profile.LastName;
    }
  }
}
There are a couple things to notice in the above page_load event. First, if no user is logged in, the update button is disabled. This is because it would be meaningless to press the update button if there was no current user to update. It is important to mention that this article does not address dealing with anonymous users. That is a whole different topic. Very interesting, but beyond the scope of this article. Also notice that the first and last names are only loaded when the page is not a postback. That means that only the first time this page is loaded will the data will be loaded from the Profile datastore. After the first time, the data is stored in the page's viewstate and no longer will have to be retrieved from the static Profile class. This is important to note because each time a profile property is accessed, a round trip to the membership database occurs. This is the reason using the Profile classes are often referred to as chatty with the database. Something to think about, and keep in mind when designing your application.
There are several good articles that go into more detail on using the profile provider. Scott Gu posts in his blog an excellent how to guide that steps you through creating basic Membership in a web application including customized Profile information. A good one in MSDN is Personalization and User Profiles in ASP.NET 2.0 by Dino Esposito. Another one of my favorites is Profiles in ASP.NET 2.0 by Scott Allen.
Why Do We Need This?
The questions comes up, why do we need an ObjectDataSource that encapsulates our Profile information? The answer is this. Even though ASP.NET does a wonderful job of giving us programmatic access to the Profile class it does not gives a simple way to view or update this data by binding it directly to any controls like gridview or detailsview. Joshua Flanagan wrote a very nice tool called ProfileView that you can see on his blog. Basically, he wrote an ASP.NET 2.0 server control that enables users to view and/or edit the Profile data. It does this using reflection at runtime to figure out what the profile information is, then it shows it.
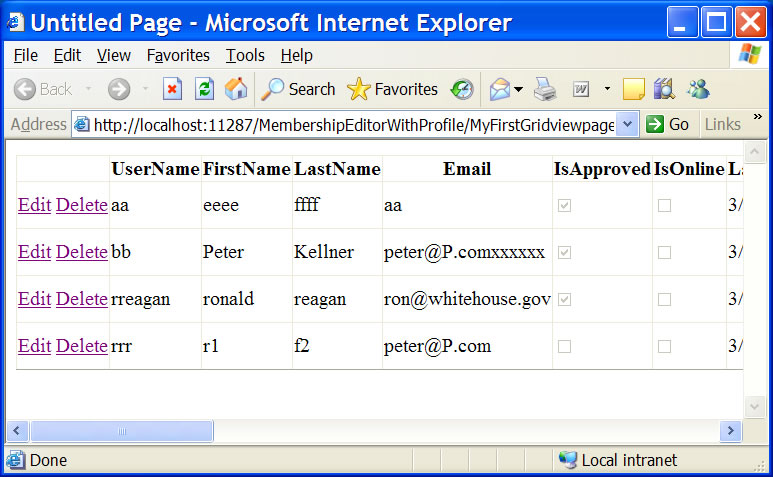
The ObjectDataSource allows you at design time to make the presentation layer look exactly as you like. It also allows for viewing multiple members profiles at the same time. Take a look at the screen shot below to see what a gridview looks like using on ObjectDataSource generated using this technology. Also, you can play with it live right here.
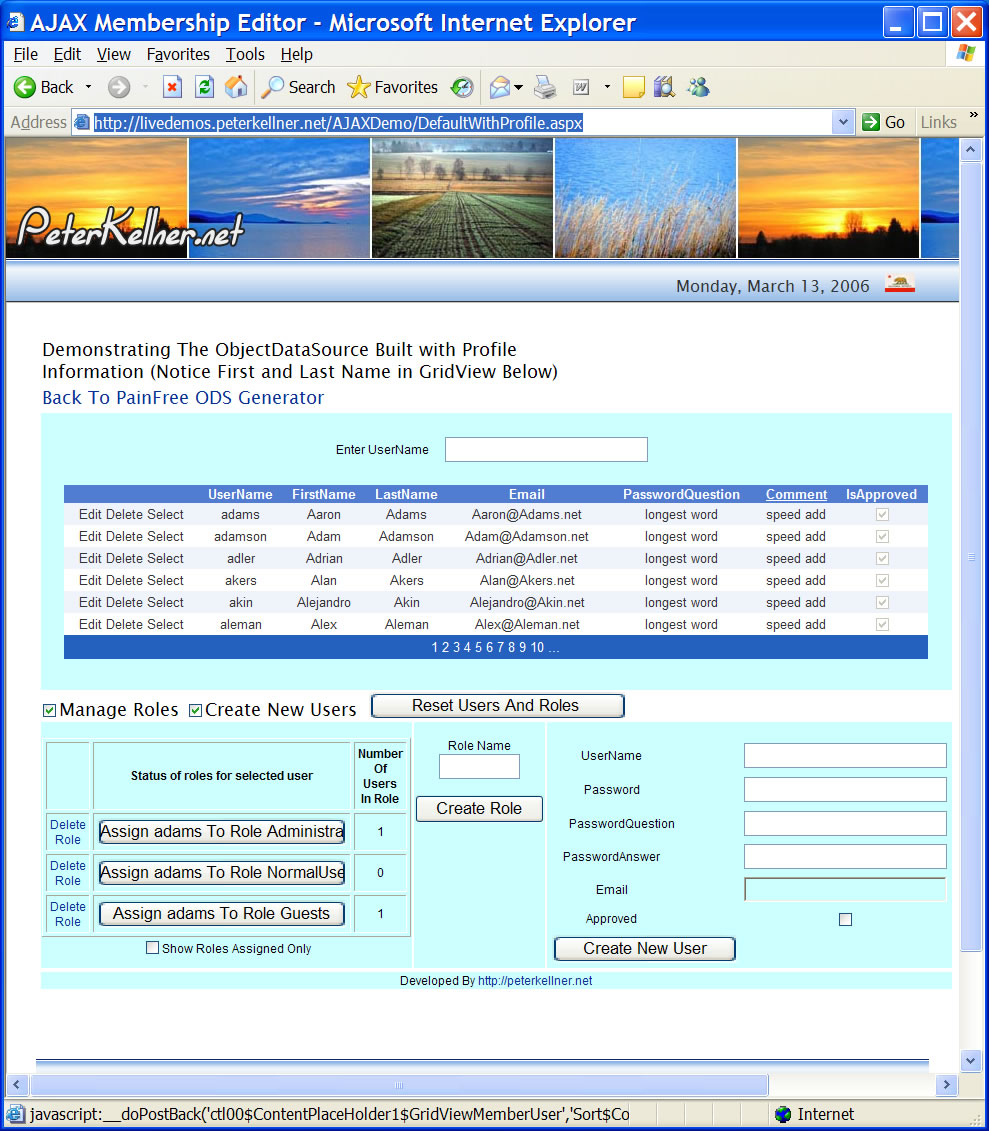 |
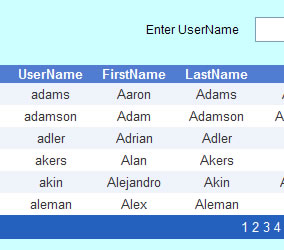 |
At first glance, this is identical the screen developed in Part 2 of this series. If you look closer however (or at the picture to the right of the first one), you'll notice that there are two new columns. First Name and Last Name. Both of these columns have data retrieved from the Membership Profile data provider we have been discussing. In the next section the details of what changes to the ObjectDataSource in the previous article have been made to allow this to happen. Something very important to note however, is that since the ObjectDataSource is basically a static class, the profile information in that ObjectDataSource will not automatically change when the web.config is changed (unlike Joshua Flanagan's solution which will change).
Adding Profile Information to the ObjectDataSource
As was mentioned earlier, the ObjectDataSource developed here is 100% based on the one developed in Part II of this MSDN series, Implementation. The discussion here assumes all the previous code is understood and only explains the additions to support the Profile feature. All the code described here is what gets generated by the ObjectDataSource generator on Peter Kellner's Blog (this tool is discussed in greater detail in the next major section of this article). In this section we go through the details of what gets added. In the next section it is shown how the steps to generating the source described here from an existing web.config file.
Changing Class Names
Since it's possible the ObjectDataSource geneated here may be used in the same project as the one provided with Part 2 of this series, all the public names have been changed to avoid naming conflicts. For example, the class name MembershipUserODS has been renamed to MembershipUserAndProfileODS. The RoleData class has been renamed RoleDataForMP and the MemberhipUserWrapper class has been renamed MembershipUserWrapperForMP (MP standing for MembershipProfile).
The Insert Method
The method signature of Insert now contains all the names of the Profile properties. In addition to Membership.CreateUser being called, the Profile properties must be saves also with the Profile.Save() method. Below is the complete Insert method for an example set of profile properties (profile properties are stored in the web.config file and will likely be different for each asp.net web application).
[DataObjectMethod(DataObjectMethodType.Insert, true)] public void Insert(string userName, bool isApproved, string comment, DateTime lastLockoutDate, DateTime creationDate,string email, DateTime lastActivityDate, string providerName, bool isLockedOut,DateTime lastLoginDate, bool isOnline, string passwordQuestion, DateTime lastPasswordChangedDate, string password, string passwordAnswer, string firstName, string lastName, bool advancedMode, string address_Street, string address_City, string address_State, string address_Zip ) {MembershipCreateStatus status; Membership.CreateUser(userName, password, email, passwordQuestion, passwordAnswer, isApproved, <span class="kwrd">out</span> status); <span class="kwrd">if</span> (status != MembershipCreateStatus.Success) { <span class="kwrd">throw</span> <span class="kwrd">new</span> ApplicationException(status.ToString()); } MembershipUser mu = Membership.GetUser(userName); mu.Comment = comment; Membership.UpdateUser(mu); ProfileCommon pc = (ProfileCommon)ProfileBase.Create (mu.UserName, <span class="kwrd">true</span>); pc.FirstName = firstName; pc.LastName = lastName; pc.AdvancedMode = advancedMode; pc.Address.Street = address_Street; pc.Address.City = address_City; pc.Address.State = address_State; pc.Address.Zip = address_Zip; pc.Save();}
Something also to take note of is the the variable names are constructed with an underscore because variable names with periods would not work. Notice in particular the properties that are nested such as address_state. This refers to the Profile property pc.Address.State.
The Delete Method
The delete method has no changes. This is because the membership class takes care of removing all profile information when Membership.DeleteUser() is invoked.
The Update Method
The Update method is changed. To the parameter list is added all the parameters representing properties. Then, in the update method itself the profile information is update after the Membership is updated. below is a portion of the code for this using the example properties.
ProfileCommon pc = (ProfileCommon)ProfileBase.
      Create(mu.UserName, true);
    pc.FirstName = firstName;
    pc.LastName = lastName;
    pc.AdvancedMode = advancedMode;
    pc.Address.Street = address_Street;
    pc.Address.City = address_City;
    pc.Address.State = address_State;
    pc.Address.Zip = address_Zip;
    pc.Save();
The Get (Select) Methods
Just like in Part 2 of this series, there are several Get Methods provided. No additional get methods are added, however now, because of the addition of the Profile properties, the Get Method's return profile properties include Membership Properties as well as Profile properties. This is handled by first retrieving the Membership data with GetUser or GetUsers methods, then adding the additional properties from the profile to the Generic list which will get returned. The critical section of code that does this is next.
MembershipUserCollection muc = Membership.GetAllUsers();
foreach (MembershipUser mu in muc)
{
 if ((returnAllApprovedUsers==true && mu.IsApproved==true) ||
 (returnAllNotApprovedUsers==true && mu.IsApproved==false))
 {
    MembershipUserWrapperForMP md =
      new MembershipUserWrapperForMP(mu);
    ProfileCommon pc = (ProfileCommon)ProfileBase.Create
      (mu.UserName, true);
    md.FirstName = pc.FirstName;
    md.LastName = pc.LastName;
    md.AdvancedMode = pc.AdvancedMode;
    md.Address_Street = pc.Address.Street;
    md.Address_City = pc.Address.City;
    md.Address_State = pc.Address.State;
    md.Address_Zip = pc.Address.Zip;
    memberList.Add(md);
 }
}
Sorting Support
Sorting the ObjectDataSource's columns is also supported. Just as in Membership Part 2, this is supported using anonymous delegates. Basically, a comparater method is created with an anonymous delegate that takes two parameters. The left and right hand side of a sort operation. Then, using this comparater, the generic List is sorted before being returned to the caller. This very clever construct was inspired by Ted Neward at a Code Camp in Portland.
Just like the MembershipUser properties, Profile properties are handled the same way so that those values can be sorted in a GridView by clicking on the column headers. Below is the creation of one comparater method.
switch (sortDataBase)
{
  case "FirstName":
    comparison = new
      Comparison<membershipuserwrapperformp>(
       delegate(MembershipUserWrapperForMP lhs,
            MembershipUserWrapperForMP rhs)
       {
           return lhs.FirstName.CompareTo(
              rhs.FirstName);
       }
     );
    break;</membershipuserwrapperformp>
The Class associated with the Generic List
The final piece of code that has to be extended is the Class that is returned from the Get methods. That is the generic list which is declared as follows.
 protected void Page_Load(object sender, EventArgs e)
{
  // Only allow for profile update when a user is logged in
  MembershipUser mu = Membership.GetUser();
  if (mu == null)
  {
    ButtonUpdate.Enabled = false;
  }
  else
  {
    if (!IsPostBack)
    {
      TextBoxFirstName.Text = Profile.FirstName;
      TextBoxLastName.Text = Profile.LastName;
    }
  }
}
One Final Trick on Using the ObjectDataSource
ObjectDataSource's are great for using with databound ASP.NET's controls such as GridView and DetailsView. They are wired such that the get methods, update, delete and insert line up perfectly with what those controls are looking for. However, the ODS's can be used directly without having a presentation style control associated with them. For example, the Insert method associated with adding a new member in the included code from the asp.net page MembershipWithProfile.aspx uses the ObjectDataSource to insert even though it is not bound to any control on the page. The data it is entering is coming from TextBox's in a table. Below is the Insert code used. Notice how straight forward it is to use compared do creating an inserter and doing all the ADO without this class.
protected void ButtonNewUser_Click(object sender, EventArgs e) {MembershipUtilities.MembershipUserAndProfileODS membershipUserAndProfileODS = <span class="kwrd">new</span> MembershipUserAndProfileODS(); membershipUserAndProfileODS.Insert( TextBoxUserName.Text, CheckboxApproval.Checked, <span class="kwrd">string</span>.Empty, DateTime.Now, DateTime.Now, TextBoxEmail.Text, DateTime.Now, <span class="kwrd">string</span>.Empty, <span class="kwrd">false</span>, DateTime.Now, <span class="kwrd">false</span>, TextBoxPasswordQuestion.Text, DateTime.Now, TextBoxPassword.Text, TextBoxPasswordAnswer.Text, TextBoxFirstName.Text, TextBoxLastName.Text, <span class="kwrd">false</span>, <span class="kwrd">string</span>.Empty, <span class="kwrd">string</span>.Empty, <span class="kwrd">string</span>.Empty, <span class="kwrd">string</span>.Empty); GridViewMemberUser.DataBind(); TextBoxUserName.Text = <span class="kwrd">string</span>.Empty; TextBoxFirstName.Text = <span class="kwrd">string</span>.Empty; TextBoxLastName.Text = <span class="kwrd">string</span>.Empty; TextBoxPassword.Text = <span class="kwrd">string</span>.Empty; TextBoxEmail.Text = <span class="kwrd">string</span>.Empty; TextBoxPasswordAnswer.Text = <span class="kwrd">string</span>.Empty; TextBoxPasswordQuestion.Text = <span class="kwrd">string</span>.Empty; CheckboxApproval.Checked = <span class="kwrd">false</span>;}
Because this is an actual class with properties, using the ObjectDataSource class is type safe. For example, in the code below, the user may want to count how many zipcodes in the membership database that begin with 9. Here is the code to do it. Notice how Address_Zip is used in a type safe way.
protected void ButtonZipCount_Click (object sender, EventArgs e) { MembershipUtilities.MembershipUserAndProfileODS membershipUserAndProfileODS = new MembershipUserAndProfileODS();List<membershipuserwrapperformp> li = membershipUserAndProfileODS.GetMembers (<span class="kwrd">string</span>.Empty); <span class="kwrd">int</span> count = 0; <span class="kwrd">foreach</span> (MembershipUserWrapperForMP mu <span class="kwrd">in</span> li) { <span class="kwrd">if</span> (mu.Address_Zip.StartsWith(&quot;9&quot;)) { count++; } }}</membershipuserwrapperformp>
Using the Profile Generating Website
All the changes listed in the previous section could be done by hand, however this would be very tedious. To make this process much easier, a code generator has been developed which takes as input the applications web.config file's <System.Web> section. The idea is to cut this out of the web.config file and paste it into the web page which will generate the code for you. Below is a screen show of what the web page looks like. When you get to this page, you must first click on the button in the right column labeled "Click Here to Begin".
Here is the URL: http://painfreeods.peterkellner.net/
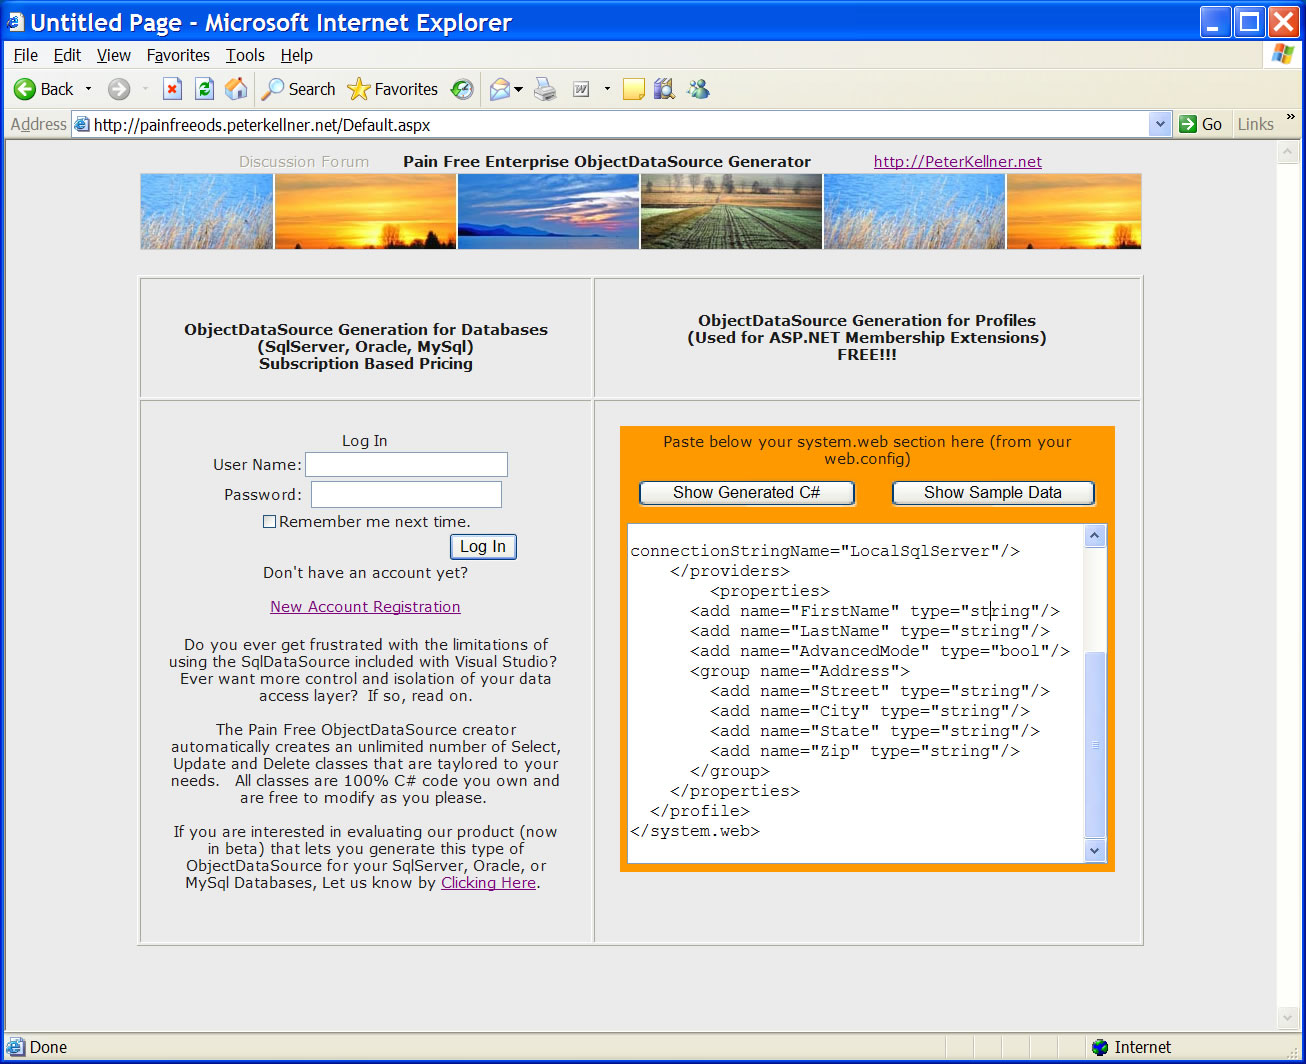
The XML which is pasted into the multi line orange textbox is as follows (you should paste your own in here).
<system  .web>
  <profile defaultprovider="SqlProfileProvider">
    <providers>
      <remove name="AspNetSqlProfileProvider" />
      <add name="SqlProfileProvider" connectionstringname="LocalSqlServer" type="System.Web.Profile.SqlProfileProvider" />
    </providers>
    <properties>
      <add name="FirstName" type="string" />
      <add name="LastName" type="string" />
      <add name="AdvancedMode" type="bool" />
      <group name="Address">
        <add name="Street" type="string" />
        <add name="City" type="string" />
        <add name="State" type="string" />
        <add name="Zip" type="string" />
      </group>    </properties>  </profile>
</system>
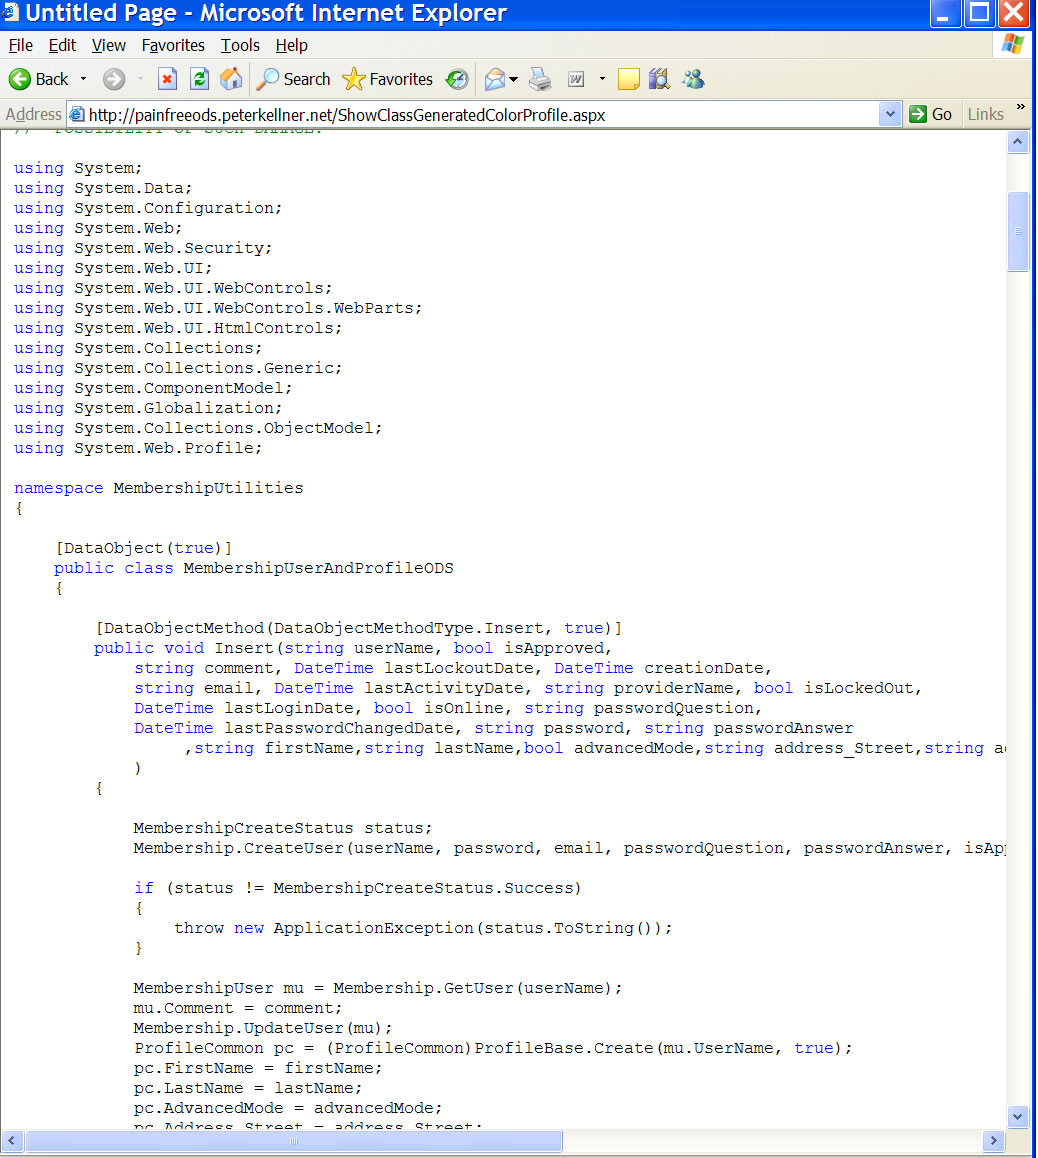
Now, if the "Show Generated C#" button is pressed, the complete ObjectDataSource will be created. This code can then be cut and pasted into the App_Code directory of the web project. Here is what the screen looks like.
There are some limitations to this code generation technology. First is that there can only be one level of nesting. That is, there can be no groups of groups. Just one level of grouping is allowed as is shown here. It is OK to have multiple groups, just not nested. Another limitation is the type associated with the name must be a C# type. That is, string, bool,DateTime,etc. The final limitation (known about) is that it can not handle Array or Collection type properties. All properties must be single valued.
At this point, error checking is minimal so if the limitations are exceeded, something will likely come out but it may not be what was desired.
Build A Simple Web Page
Now that the C# class has been generated, the next steps are very straight forward. For those who have not built a GridView based on an ObjectDataSource, here is a pictorial step by step of the 9 things needed to do to have a very simple gridview control in under 5 minutes.
|
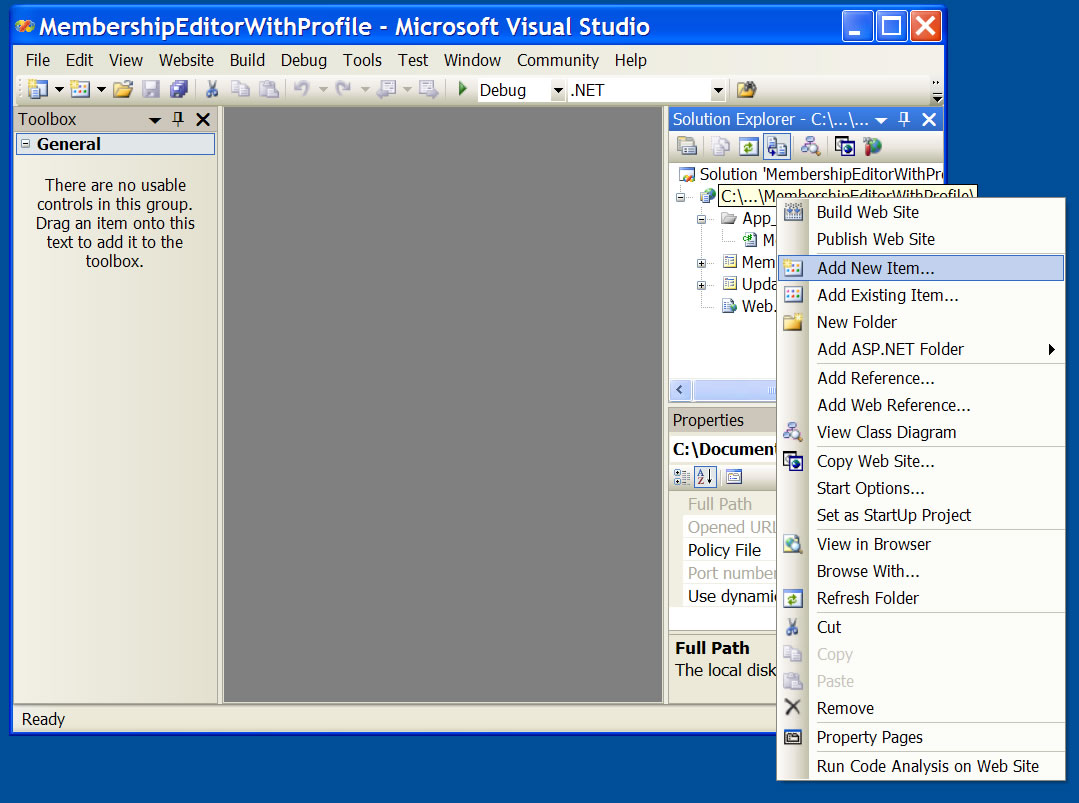
1. Add a New Web Page to the Project |
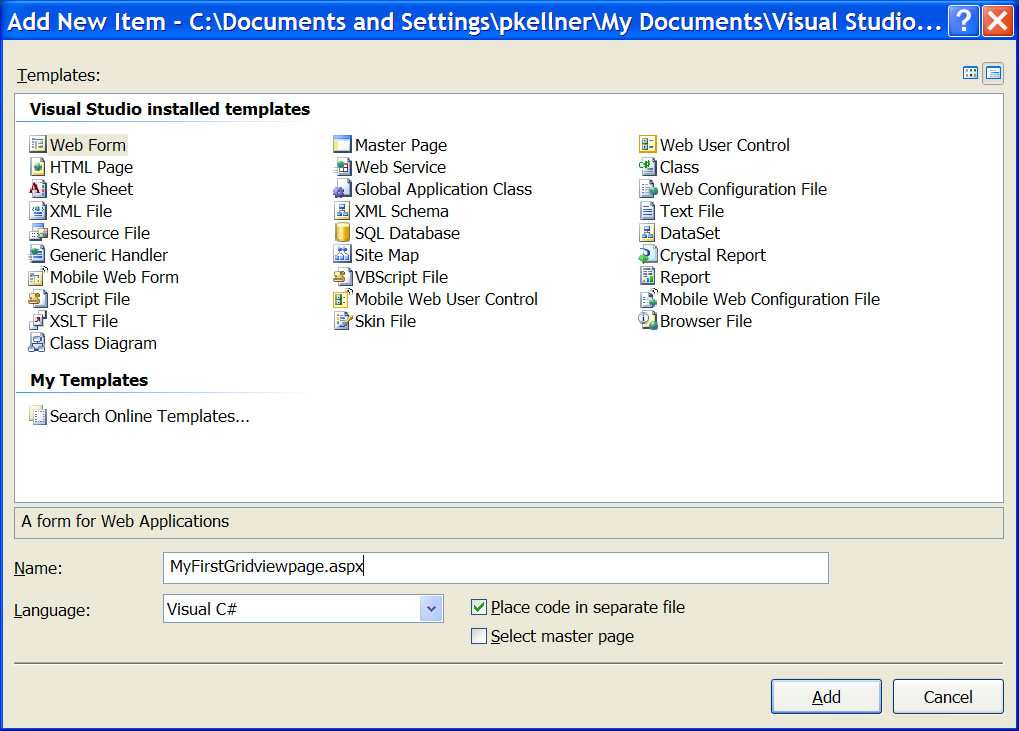
2. Choose Web Page and Name it |
|
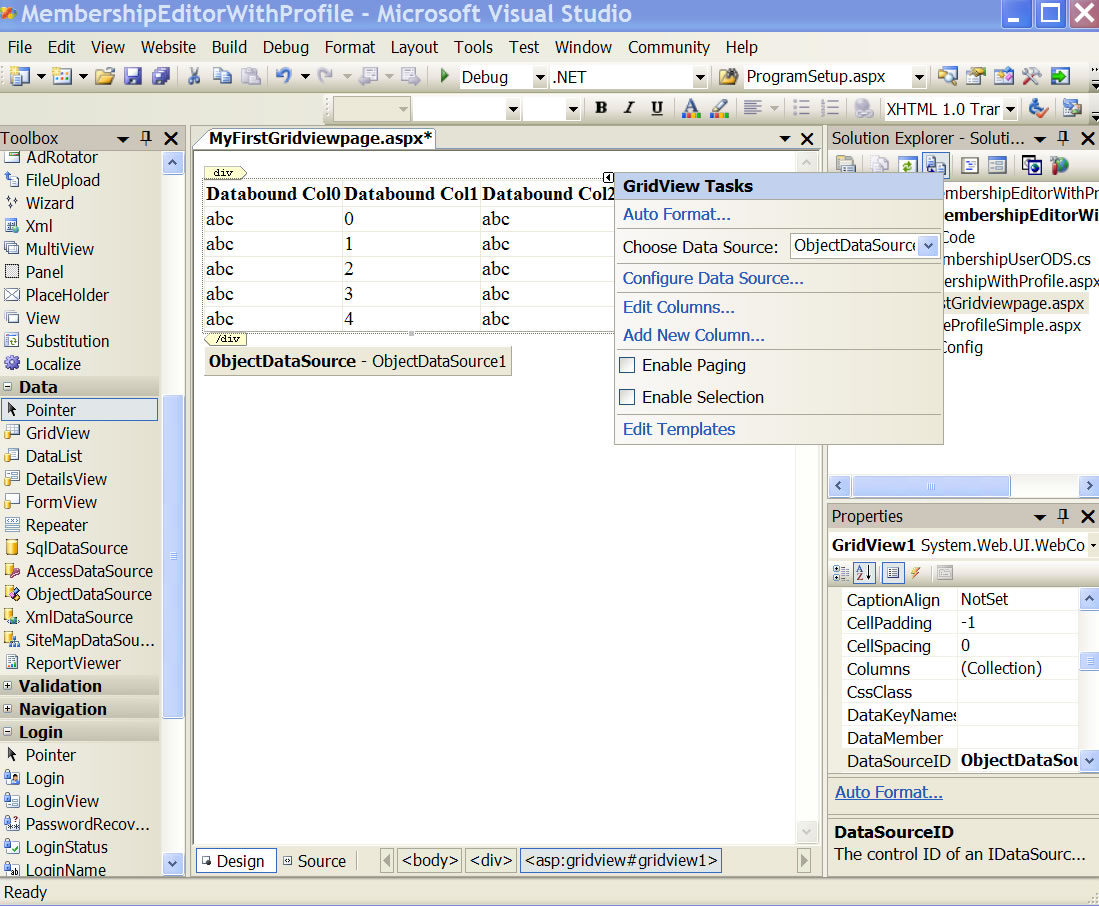
3. Add a GridView and an ObjectDataSource. Associate them |
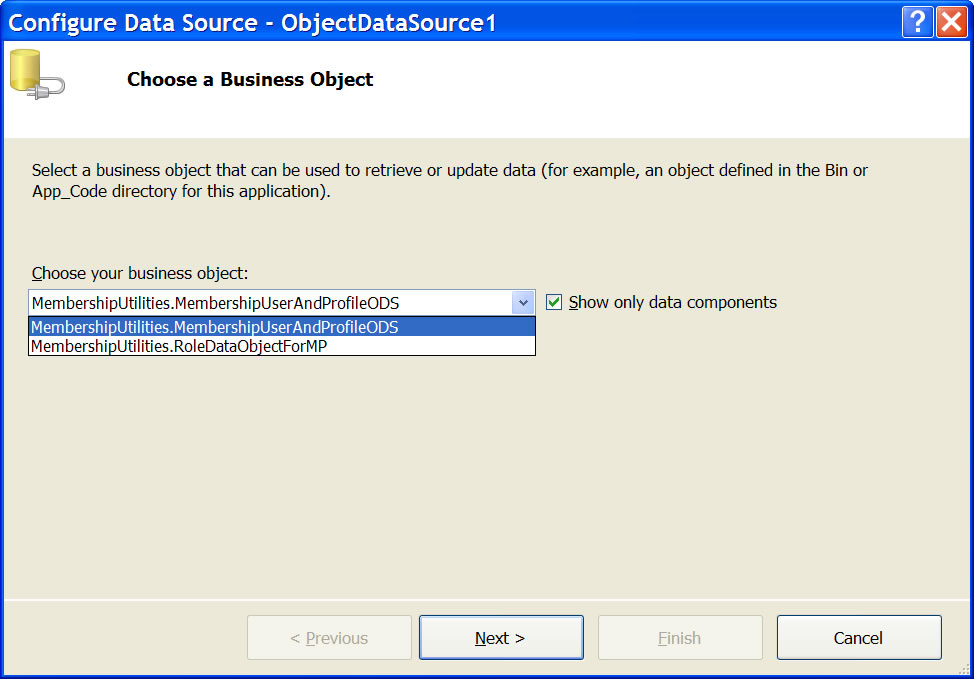
4. Configure the ObjectDataSource by Assigning the Class |
|
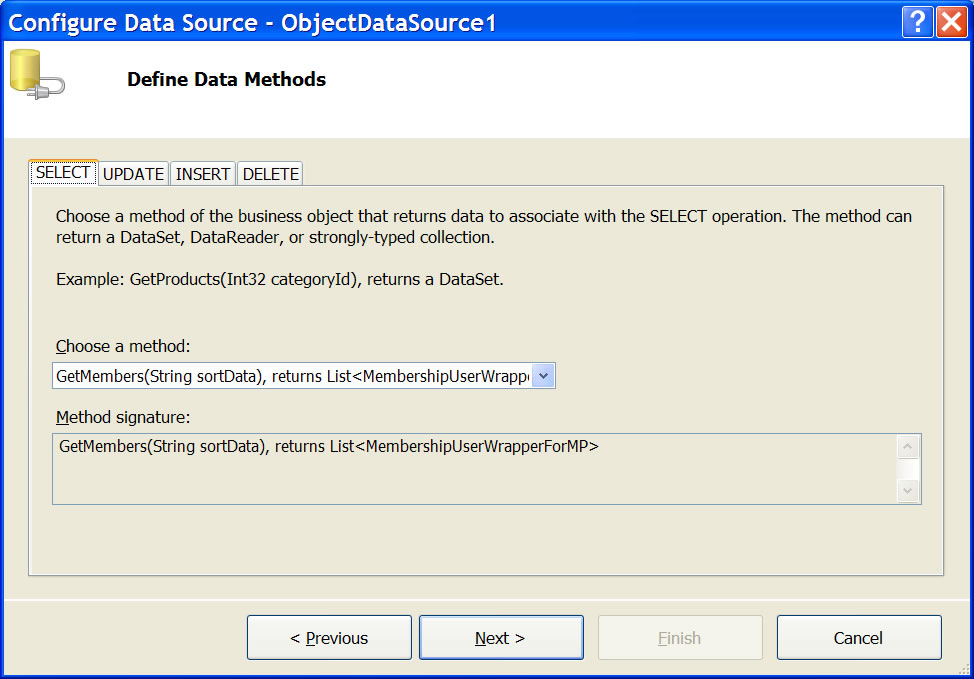
5. Choose the Get Method (Use Default) |
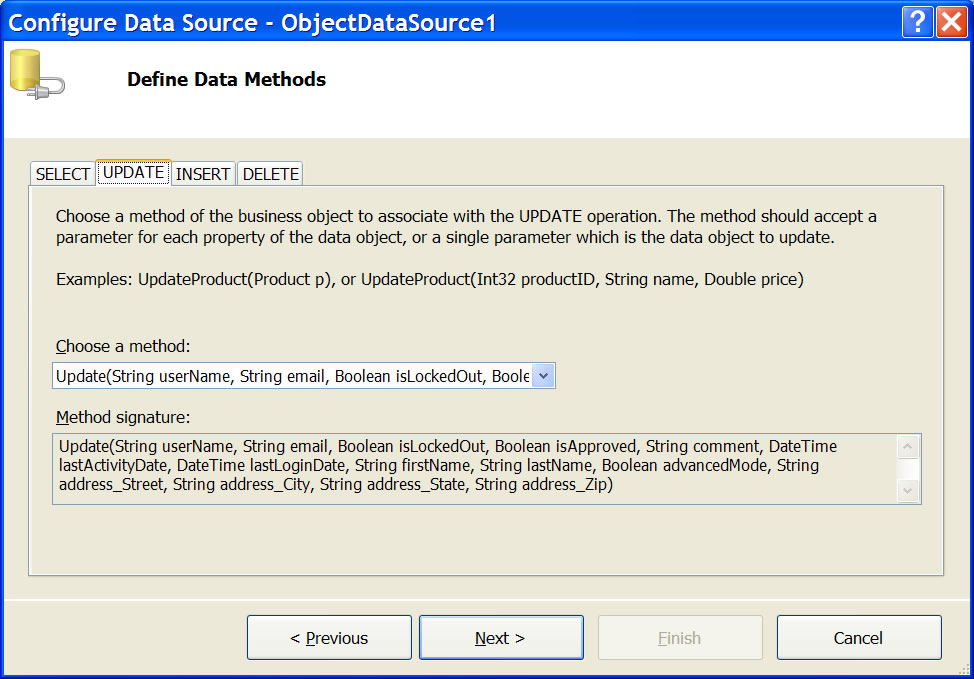
6. Choose the Update Method (Use Default) |
|
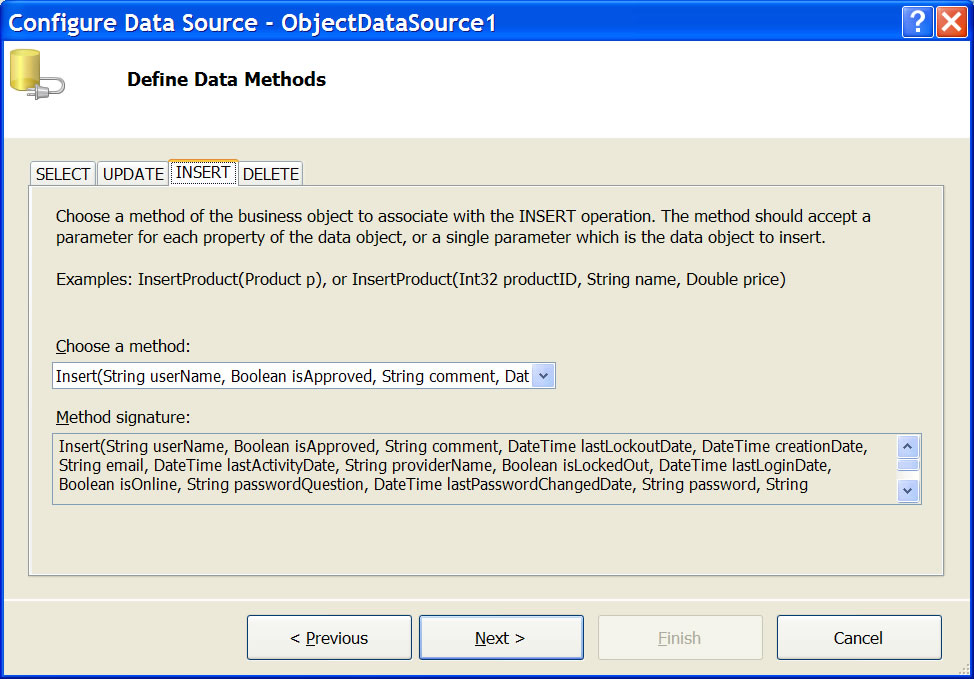
7. Choose the Insert Method (Choose Default) |
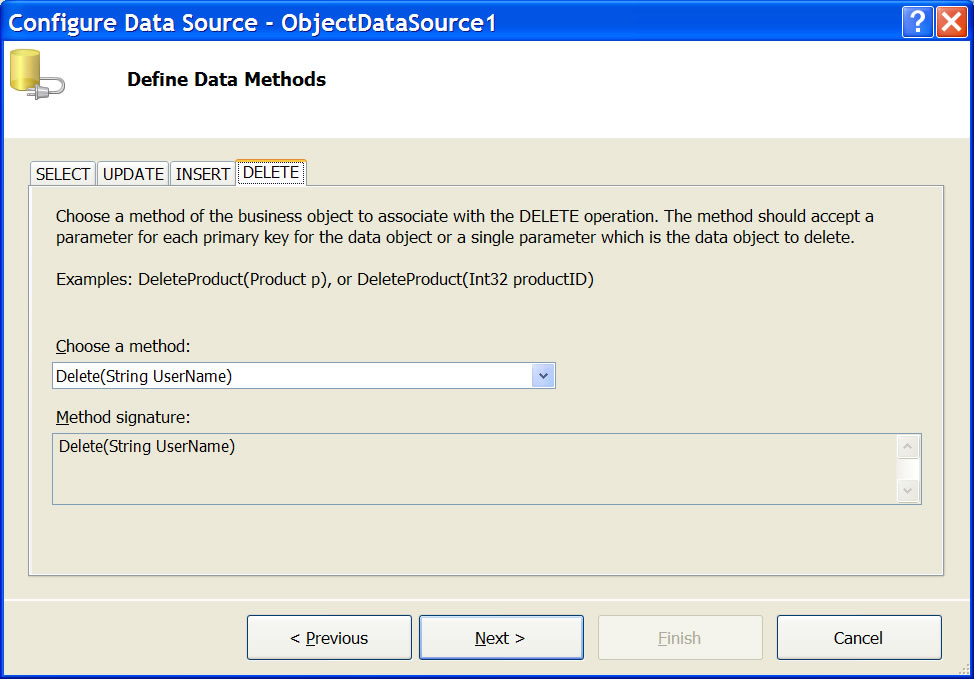
8. Choose the Delete Method (Choose Default) |
|
9. Run it! (OK, had to enable edit and delete on Gridview. No more boxes left) |
The code in the associated source to this article has a web apge ( MembershipWithProfile.aspx) which is very similar to what is done here.
Conclusions
Profiles are a very powerful way to store information about Membership. It's powerful in that with very little coding, lots of additional information about logged in users is available. With this tool, there is now a better way to organize this information and maintain it. Briefly mentioned earlier were the performance implications of using Profile information. It is important to understand what his happening under the covers when this technology is used. As long there is an understanding of what is happening and it is acceptable in the web application being developed, this is a wonderful technology.
Finally, as a plug to the technology that was used in this free ObjectDataSource creator, the Pain Free ObjectDataSource Creator, available through subscription on this blog, lets the developer generate very flexible ObjectDataSource's to access database information in SqlServer, MySql and Oracle. Unlike the Profile ODS generator in this article, the ODS generator for databases gives you a large amount of flexibility. An infinite number of getter methods, updaters and inserters can be defined. It works with views, and also stored procedures. Any questions on the Pain Free ODS Generator, click here.
Thanks for reading, and best of luck with your coding projects.