Using Microsoft's Visual Studio Design Templates
Author: Peter Kellner
Date: August 27th, 2006
Our Story
It's Monday, August 21st, we have our CodeCamp scheduled for October 7th and 8th in Los Altos California and we realize we need to have our web site to sign up and running yesterday! For those of you who don't know what a codecamp is, basically, it's a developer to developer weekend meeting where high quality presentations are given to an audience of enthusiastic developers. Typically, 30 or 40 speakers running simultanious presentations to 300 or so attendees. Codecamps are all Volunteer, all free, and always on a weekend. So, our web site needs to allow sign ups for speakers and their presentations, attendess to let us know they are coming, provide information about the Venue as well as ultimately provide scheduling information about classes. Most importantly, it needs to do it with style and pizazz.
Microsoft's Professional CSS Design Templates to the Rescue
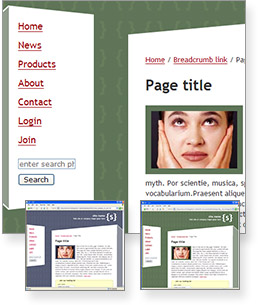
Personally, I'm good at building web site plumbing, doing things like building master pages, doing database access, making tables and labels, but to put it might it simply, I'm web design skill challenged. This is where Microsoft has done me a huge service by providing reference CSS Design templates I can use to create professional looking web sites. For our codecamp web site I took a look at the five templates available to me. The one that caught my eye for CodeCamp was the fun style web site on the left (also as shown on Microsoft's web site).
It has a three dimensional, building block kind of look, a simple clean design and would allow me to have all the functionality I wanted in my web site. Taking a peak at the finished web site you can see the similarity.
Our Finished Product
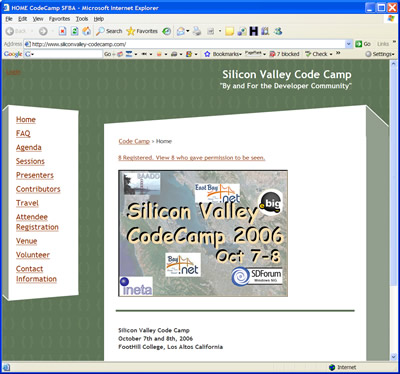
Let's take a look at the steps involved. As good engineers, we know what 60 of the "zero to 60" will look like (see picture on right), we know what "zero" looks like (Visual Studio 2005, File/New Empty Website), now we just need to figure out what the steps in the middle are.
By way of comparison between what Microsoft provides with their CSS Design Templates and our finished product, notice the menu on the left. Same format, just different content. Notice the title on the top, the header on the bottom as well as of course the great looking building block graphics giving the site the "fun" look and feel.
In the next section, will discuss the mapping between asp.net 2.0 and the CSS. Then, we will go into more details about how to make it happen. As a "tables" kind of HTML programmer it warms my heart (as well as all the viewers of my sites) to be able to deliver a css enabled web site.
Mapping CSS to ASP.NET 2.0
Lets first briefly talk some about what it takes to use a CSS file in a asp.net web site. First, you need to have CSS that supports the basic constructs you will be using. Assuming you are going to use a master page to implement your web site, you'll need to have containers (also known as div tags) that wrap all the different parts of your web site. This includes things like headers, footers, menu's, login controls, as well as of course the content. We will now go into a little detail on some of these areas to help you understand the steps.
Headers
If you look in the CSS file for the FUN site, you'll see the following definition for "sitename" and "slogan" .
#sitename {
position:absolute;
top:20px;
right:100px;
text-align:right;
color:#FFFFFF;
font-size:1.8em;
font-weight:bold;
}
#sitename a {
text-decoration:none;
color:#FFFFFF;
border-bottom:none;
}
#slogan {
font-size:.65em;
margin:0px;
text-align:right;
}
In the reference site for Microsoft's CSS Fun Site, you'll see that they use the CSS for the title as follows:
<div id="sitename">
<a href="#" title="site name - home page">site name</a>
<div id="slogan">
Web site or company slogan goes here</div>
</div>
In our ASP.NET 2.0 http://www.siliconvalley-codecamp.com, we use a similar construct for our title as follows:
<div id="sitename">
<a href="#" title="Silicon Valley Code Camp">Silicon Valley Code Camp</a>
<div id="slogan">
"By and For the Developer Community"
</div>
</div>
Footers are implemented in a similar way. Without showing all the details this time, the following snippet shows how we used the CSS to implement our own footer.
<div id="footer-container">
<span id="footer-left"></span>
<div id="footer-right">
<p>
Silicon Valley Code Camp<br />
October 7th and 8th, 2006<br />
FootHill College, Los Altos California</p>
</div>
</div>
Lets take a look now at how to implement the menu (left side of the page) in the Master Page. This one is a little trickier because the css and Microsoft's example don't know anything about the sitemanager server control asp.net 2.0 gives us. First thing, lets view the actual css used for the menu as well as the example given to us using this css.
/******************
SIDE LAYOUT
******************/
#side-container-outer {
width:20%;
position:absolute;
top:120px;
left:0px;
padding-bottom:100px;
}
#block-side-top-right {
width:92%;
height:25px;
float:right;
}
#block-side-top-left {
width:8%;
height:25px;
float:left;
background: url(block-side-top-left.gif) no-repeat top right;
}
#side-container-inner{
background: #929E8E;
margin:0px;
padding:0px;
}
#side {
background: #FFFFFF;
width:70%;
margin-left:8%;
padding:0 12% 10px 10%;
}
#block-side-bottom-left {
width:8%;
height:25px;
float:left;
background: url(block-side-bottom-left.gif) no-repeat bottom right;
margin:0px;
padding:0px;
}
#block-side-bottom-right {
width:92%;
height:25px;
float:right;
margin:0px;
padding:0px;
}
Now, lets look at the actual implementation that gives Microsoft their default menu in their template example.
<div id="side-container-outer">
<div id="block-side-top-right">
<img src="App_Themes/default/block-side-top-right.gif"
alt="" width="100%" height="25" /></div>
<div id="block-side-top-left">
</div>
<div class="clear">
</div>
<div id="side-container-inner">
<div id="side">
<div class="clear">
</div>
<!-- BEGIN NAV ITMES -->
<div class="none">
<a href="#maincontent">goto main content</a>
</div>
<ul>
<li><a href="#" title="">
Home</a></li>
<li><a href="#" title="">
News</a></li>
<li><a href="#" title="">
Products</a></li>
<li><a href="#" title="">
About</a></li>
<li><a href="#" title="">
Contact</a></li>
&n bsp; <li><a href="#" title="">
Login</a></li>
<li><a href="#" title="">
Join</a></li>
</ul>
<div class="separator-side-column">
</div>
<!-- END NAV ITEMS -->
</div>
<div>
<div id="block-side-bottom-right">
<img src="App_Themes/default/block-side-bottom-right.gif"
alt="" width="100%" height="25" /></div>
<div id="block-side-bottom-left">
</div>
</div>
</div>
</div>
Because we are going to use the asp.net 2.0 server control SiteManager, our aspx file will look considerable different but will yield the same look and feel.
<div id="side-container-outer">
<div id="block-side-top-right">
<img src="App_Themes/default/block-side-top-right.gif"
alt="" width="100%" height="25" /></div>
<div id="block-side-top-left">
</div>
<div class="clear">
</div>
<div id="side-container-inner">
<div id="side">
<div class="clear">
</div>
<!-- BEGIN NAV ITMES -->
<asp:SiteMapDataSource ID="SiteMapDataSource1"
runat="server" ShowStartingNode="false" />
<asp:Repeater ID="foo" runat="server"
DataSourceID="SiteMapDataSource1" >
<HeaderTemplate>
<ul>
</HeaderTemplate>
<ItemTemplate>
<li><a href='<%#Eval("url") %>'>
<%# Eval("Title") %>
</a></li>
</ItemTemplate>
<FooterTemplate>
</ul>
</FooterTemplate>
</asp:Repeater>
<div class="separator-side-column">
</div>
<!-- END NAV ITEMS -->
</div>
<div>
<div id="block-side-bottom-right">
<img src="App_Themes/default/block-side-bottom-right.gif"
alt="" width="100%" height="25" /></div>
<div id="block-side-bottom-left">
</div>
</div>
</div>
</div>
The SiteMap Server control is basically a repeater type control which means that a template for each row being repeated must be referenced. All the rows in the menu (which are pulled from the SiteMapDataSource) are output through the SiteMap Server control. However, if you look carefully at the above two examples, you'll see that the containers (div tags) all have the same class references.
Not Everything Works out of the Box
So far, everything has seemed very straight forward. Well, life is not always so simple. For example, on our Presenters web page, we want to use the three column content that the css fun template provides us but unfortunately, there example looks like what I have pictured below on the left, and we want to make it look like what is pictured on the right. To do this, we are going to have to do a little minor surgery on the css file. Not very hard though since Microsoft's template is almost correct.
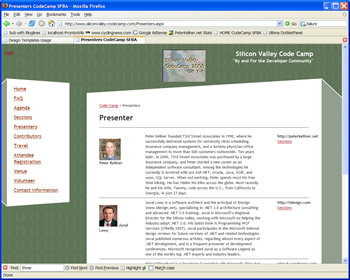
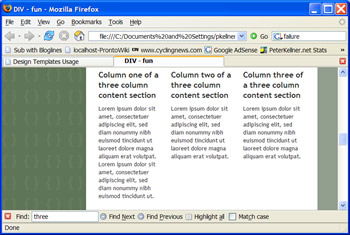
The first thing you notice is that the Microsoft example of using the template on the left has columns that are roughtly equal in size. For our web site, we want to have a narrow column for the picture, a wide column for the course description, and then a narrow column to show the presenters website. What we get from the css gives is a great starting place. Below are all the css tags needed from the css file to make the three equal width columns.
/******************
Three Column Section
******************/
#three-column-container {
width:100%;
margin:10px 0px;
padding:10px 0px
}
#three-column-left {
float:left;
width:30%;
}
#three-column-right {
float:right;
width:30%;
}
#three-column-middle {
width:30%;
margin:0px 31% 0px 35%;
}
Using this in their sample code, Microsoft used the following HTML to generate the page above on the left.
<div id="three-column-container">
<div id="three-column-left">
<h2>
Column one of a three column content section</h2>
Lorem ipsum dolor sit amet, consectetuer adipiscing elit, sed diam nonummy nibh
euismod tincidunt ut laoreet dolore magna aliquam erat volutpat. Lorem ipsum dolor
sit amet, consectetuer adipiscing elit, sed diam nonummy nibh euismod tincidunt
ut.</div>
<div id="three-column-right">
<h2>
Column three of a three column content section</h2>
Lorem ipsum dolor sit amet, consectetuer adipiscing elit, sed diam nonummy nibh
euismod tincidunt ut laoreet dolore magna aliquam erat volutpat.
</div>
<div id="three-column-middle">
<h2>
Column two of a three column content section</h2>
Lorem ipsum dolor sit amet, consectetuer adipiscing elit, sed diam nonummy nibh
euismod tincidunt ut laoreet dolore magna aliquam erat volutpat.
</div>
We want to modify this some, but we don't just want to modify it, we want to create another set of tags so we can preserve the original for use later. Using cut and paste (with reservation of course), we create a new set of tags and simply add a w to the end of the tag names for wide (not very creative). We then modify the margins of this new tag to give us a wide section. A little trial and error is necessary to fine tune these numbers. Below is the new css we have created.
/******************
Three Column Section Wide Middle
******************/
#three-column-containerw {
width:100%;
margin:10px 0px;
padding:10px 0px
}
#three-column-leftw {
float:left;
width:15%;
}
#three-column-rightw {
float:right;
width:15%;
}
#three-column-middlew {
width:55%;
margin:0px 22% 0px 22%;
margin:
}
Using our newly defined css "three-column-containerw", we created the presenter interface using the Repeater server control included with asp.net. Notice the use of templates to each individual presenter's information. Notice we are using div tags the way we normally use table row and column tags. Below is implementation.
<asp:Repeater ID="Repeater1" runat="server"
DataSourceID="ObjectDataSourceAllPresenters">
<HeaderTemplate>
<div id="three-column-containerw">
</HeaderTemplate>
<ItemTemplate>
<div id="three-column-leftw">
<br />
<asp:Image runat="server" ID="ImageUser"
ImageUrl='<%# "~/DisplayImage.ashx?PKID=" + Eval("PKID") %>' />
<asp:Label ID="LabelName" runat="server" Font-Bold="true"
Text='<%# Eval("UserFirstName") + " " + Eval("UserLastName") %>'>
</asp:Label>
</div>
<div id="three-column-rightw">
<asp:Label ID="Label2" runat="server"
Font-Bold="true" Text='<%# Eval("UserWebSite") %>'>
</asp:Label>
<asp:HyperLink ID="HyperLinkSessions"
NavigateUrl='<%# "~/Sessions.aspx?id=" + Eval("PKID") %>'
Text="Sessions"
runat="server"></asp:HyperLink>
</div>
<div id="three-column-middlew">
<asp:Label ID="Label1" runat="server" Text='<%# Eval("UserBio") %>'></asp:Label>
</div>
; <div class="clear"></div>
<hr />
</ItemTemplate>
<FooterTemplate>
</div>
</FooterTemplate>
</asp:Repeater>
Summary
We've demonstrated some of the techniques her necessary to take a professional built CSS and implement an asp.net 2.0 web site. Seeing the power CSS brings to the table makes it possible for a web designer and web engineer to work independently and product outstanding results. We've seen that here by taking the Microsoft Professionally developed templates, combined with an asp.net 2.0 engineer (me) for two days and the results are very impressive. Mileage will vary of course depending on the project, but this really shows what can be done in a very short amount of time.
About the author
Peter Kellner founded 73rd Street Associates in 1990, where he successfully delivered systems for university clinic scheduling, insurance company management, and turnkey physician office management to more than 500 customers nationwide. Ten years later, in 2000, 73rd Street Associates was purchased by a large insurance company, and Peter started a new career as an independent software consultant. Among the technologies he currently is involved with are ASP.NET, Oracle, Java, VOiP, and soon, SQL Server. When not working, Peter spends most his free time biking. He has ridden his bike across the globe. Most recently he and his wife, Tammy, rode across the U.S., from California to Georgia, in just 27 days. His blog site is https://peterkellner.net. You will find this article and the code posted in the download section.