Download Source to this article
| Author: | Peter Kellner, 73rd Street Associates |
| Date: | August 20, 2006 |
| Location: | San Jose, California USA |
| Topic: | Custom Server Control for CAPTCHA, Part 1 Usage |
Background
CAPTCHA stands for (Completely Automated Public Turing test to tell Computers and Humans Apart). The technology was originally developed at Carnegy Mellon University to help tell the difference between a human entering data into a computer system and a machine. The process typically involves showing the user a distorted picture of text and numbers, then the user must interpret this, type what they see into a text field and the computer checks for correctness. Below is a picture of a typical CAPTCHA expression. Wikipedia has a nice definition for CAPTCHA here.

Abstract
In this article, the basic usage of a CAPTCHA custom server control will be discussed. This control is for use in ASP.NET 2.0 only. It is provided in source as well as executable form which means you can use it in your app_code or bin directly. If you use the DLL version, it will support drag and drop from the Visual Studio 2005 Toolbox. The control supports templates which means you can customize it to work in your application giving a consistent look and feel.
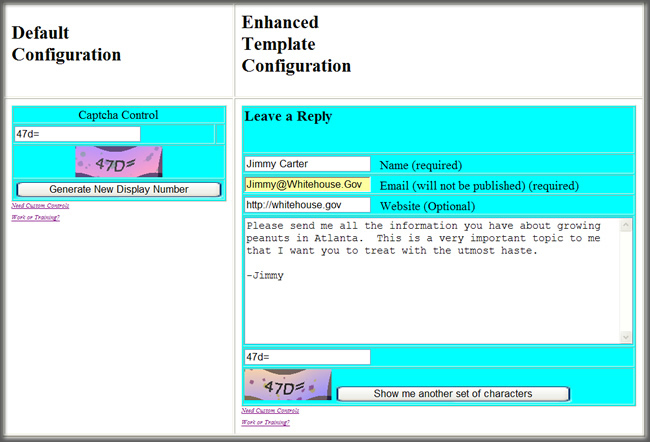
Below are two representations of the use of the CAPTCHA custom server control. One is simply using the control in it's default configuration with no template, and the other is after modifying the controls template with extra contact information.
Simple Usage Scenario
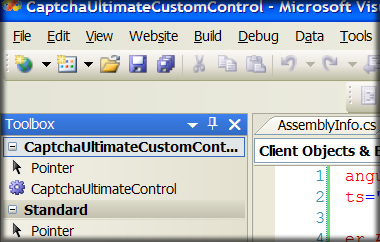
Assuming you have installed the Ultimate CAPTCHA control correctly, you will see in your Visual Studio 2005 Toolbox the CAPTCHA Control. Below is a screen shot of this.

Notice the first entry in the toolbox is the CaptchaUltimateControl. This control was placed on the work surface by dragging and dropping it. What you are seeing is the default control with no template (we will learn more about that later). Then, after the control is dropped on the work surface, you can select it and you will see a list of properties in the properties dialog. These properties can be changed and the control will dynamically update on your work surface. Below is a more detailed list of the properties you can set and what they mean.
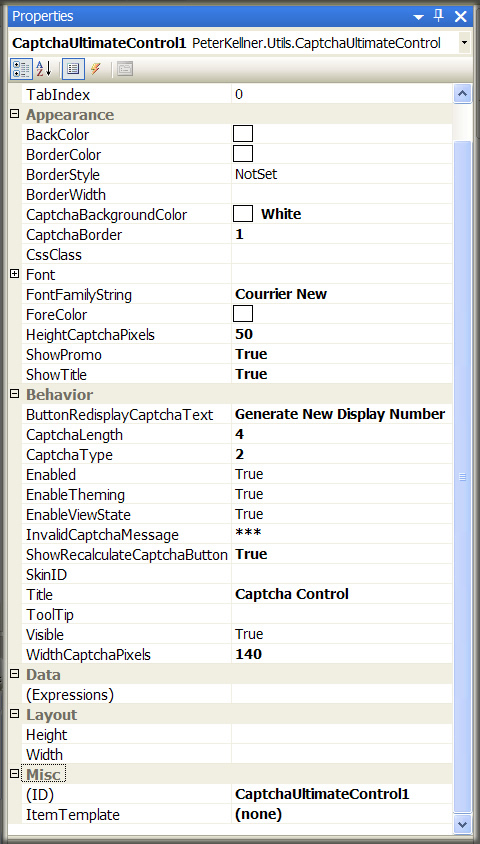 |
There are several properties that are not quite self explanatory. Those are detailed below:
CaptchaLength: This is the number of characters to be displayed in the CAPTCHA message CaptchaType: There are two types of CAPTCHA that can be displayed. Type 1 looks like this:
and type 2 looks like this:
ShowRecalculateCaptchaButton: This lets you display a button the user can press to show a different number. They may have trouble reading the first one. |

Installation
Since we have seen what it looks like to use the control, we now need to discuss the steps to install it for use. It is possible to use the control without a DLL, however because the control uses embedded resources (image files), you would need to make modifications to the source for this to work. In this article, I will only discuss using the control as a DLL. Using the DLL approach gives you the most flexibility as well.
Extract the download to an empty directory
First step is to extract the download associated with this article into an empty directory that Visual Studio 2005 can access. Basically, there are two projects in this download. The Class Library project called CaptchaUltimateCustomControl is the project that builds the DLL you will be using in either your C# or VB Web Application Project. The second project is called SampleApp is just simply a sample application built that uses the custom control.
In the sample project, there are three sample pages for demonstration. DefaultNoCustomTemplate.aspx shows building the CAPTCHA control without using a custom template. DefaulDefaultTemplate.aspx shows what happens when you enable a template and make no changes, and DefaultCustomTemplate.aspx shows a more elaborate custom template that can be used for collecting more details information such as name, website, comments, etc. More details will be presented below on these examples. You should be able to run all three sample pages directly now.
Using the Custom CAPTCHA control in your own Project
In order to use the CAPTCHA control in your own project you need to do two things. First, you need to reference the DLL created by the CaptchaUltimateCustomControl project, then you need to add a reference to it as an HttpHandler in your projects web.config.
1. Adding the DLL reference
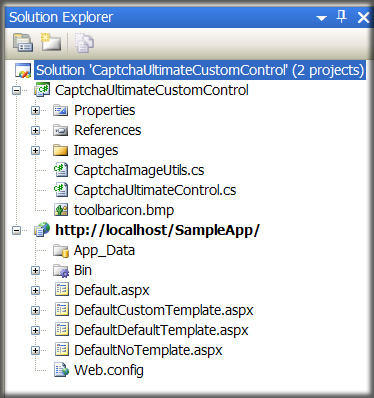
First, open the project you want to add a reference to the DLL from. Next, go to the Solutions Explorer tab, right click and say "Add Existing Project" as is show below.
 |
Choose the csproj file where you downloaded your CaptchaCustomControl as follows.
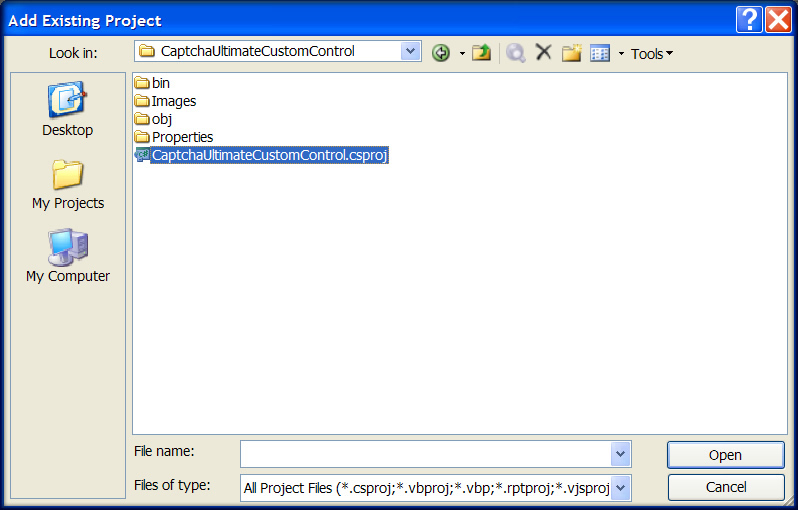
At this point, you should see the CAPCHA custom control on your ToolBox. If you don't, I've had the same problem and I understand Microsoft knows about it. Sometimes, exiting and reentering VS2005 clears it up, other times it doesn't and you may have to load your control by hand. Here is a reference to the bug in vs2005 by an asp.net team member from Microsoft. If anyone find a solution to this, please let me know. It is a very frustrating problem if you are building custom controls and using the vs2005 designer.
If it worked correctly, you should see a reference to the control on the tool bar as is shown below.
2. Adding a Reference to the HttpHandler in Web.Config
In order for the control to work correctly both in design and runtime mode, you must add the HttpHandler to your web.config file. If you do not do this, you will not see the actual CAPTCHA image appear in your control. The lines are already added to the SampleApp project's web.config file in the download so you can use that as a reference. Otherwise, just enter the below lines in your web.config file in the <system.web> section.
    <configuration>
      <system.web>
        <httpHandlers>
          <add type=“PeterKellner.Utils.CaptchaTypeHandler“
            verb=“GET“ path=“CaptchaType.ashx“/>
        </httpHandlers>
        <!–…–>
I understand that having to add this to the web.config file is a rather unpleasant burden to place on the custom control user. Fritz Onion has proposed a very clever way of getting around this dependency by having the control actually call itself. I actually followed that pattern but then realized (as others including Fritz had pointed out) that if the page were used in a scenario where URL rewriting was happening, very unexpected and incorrect results would happen. Following the principle of "least surprise", I decided against including this as part of the generic solution. If anyone can suggest a solution that does not involve having to register an HttpHandler, I'd be happy to include it.
Custom Template Support
Before talking about custom template support, it's worth briefly noting what happens when you drag the CAPTCHA custom server control on a page. Basically, two things happen. First a registration line is added to the page telling the aspx page about possible control references to a given tag, and second, the actual control with this special tag is added to the page. Below shows a typical aspx page where this drag and drop has happened.
<%@ Page Language=”C#” AutoEventWireup=”true” CodeFile=”DefaultNoTemplate.aspx.cs” Inherits=”_Default” %><%@ Register Assembly=”CaptchaUltimateCustomControl” Namespace=”PeterKellner.Utils” TagPrefix=”CAPTCHA” %> <!DOCTYPE html PUBLIC “-//W3C//DTD XHTML 1.0 Transitional//EN” “http://www.w3.org/TR/xhtml1/DTD/xhtml1-transitional.dtd”> <html xmlns=”http://www.w3.org/1999/xhtml”> <head id=”Head1″ runat=”server”> <title>Default Simple Template</title> </head> <body> <form id=”form1″ runat=”server”> <div> <CAPTCHA:CaptchaUltimateControl ID=”CaptchaUltimateControl1″ runat=”server”> </CAPTCHA:CaptchaUltimateControl> </div> </form> </body> </html>
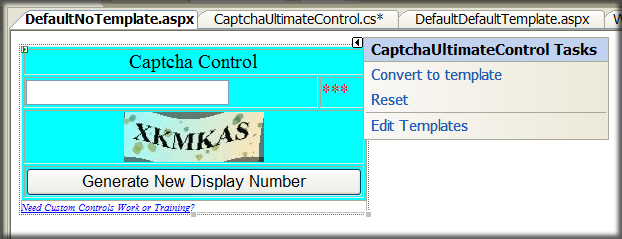
If you look at this page shown above in source, in design view, and single click on the smart tag on the controls upper right hand corner, you will get a menu with three choices: Convert to Template; Reset; and Edit Templates. Below is a picture of these three choices.
If you choose "Convert to template", the lines:
<CAPTCHA:CaptchaUltimateControl ID=”CaptchaUltimateControl1″  runat=”server”>
 </CAPTCHA:CaptchaUltimateControl>
Become:
<CAPTCHA:CaptchaUltimateControl ID=”CaptchaUltimateControl1″  runat=”server”  ButtonRedisplayCaptchaText=”Generate New Display Number”
    CaptchaBackgroundColor=”White” CaptchaBorder=”1″ CaptchaLength=”4″ CaptchaType=”2″
    CommandArg1=”" CommandArg2=”" CommandArg3=”" CommandArg4=”" CommandArg5=”" EncryptedValue=”"
    FontFamilyString=”Courrier New” HeightCaptchaPixels=”50″ InvalidCaptchaMessage=”***”
    PlainValue=”" ShowPromo=”True” ShowRecalculateCaptchaButton=”True” ShowTitle=”True”
    Title=”Captcha Control” WidthCaptchaPixels=”140″>
    <ItemTemplate>
        <table runat=”server” bgcolor=”Aqua” border=”1″>
            <tr runat=”server”>
                <td runat=”server” colspan=”2″ style=”text-align: center;”>
                    <asp:Label ID=”TitleID” runat=”server”>Captcha Control</asp:Label>
                </td>
            </tr>
            <tr runat=”server”>
                <td runat=”server”>
                    <asp:TextBox ID=”VerificationID” runat=”server”></asp:TextBox>
                </td>
                <td runat=”server”>
                    <asp:CustomValidator ID=”CustomValidatorID” runat=”server”>***</asp:CustomValidator>
                </td>
            </tr>
            <tr runat=”server”>
                <td runat=”server” colspan=”2″ style=”text-align: center;”>
                    <asp:Image ID=”CaptchaImageID” runat=”server” ImageUrl=”~/CaptchaType.ashx” />
                </td>
            </tr>
            <tr runat=”server”>
                <td runat=”server” colspan=”2″ style=”text-align: center;”>
                    <asp:Button ID=”ButtonDisplayNextID” runat=”server” Text=”Generate New Display Number” />
                </td>
            </tr>
        </table>
    </ItemTemplate>
</CAPTCHA:CaptchaUltimateControl>
When you look at the control in design view, it will look the same as before. That is because the template is layed out the same as the default configuration the control itself builds with dynamic controls. There are however some differences. First, in design mode, if you change the Captcha Type, the displayed image at design time does not change. If you don't have a template, changing CaptchaType will instantly change in the designer the type of CAPTCHA image you see. In addition, certain attributes on the <CAPTCHA:CaptchaUltimateControl> tag will no longer take precedence over what is actually in the template. An example of this is InvalidCaptchaString. You need to actually set the value in the template itself.
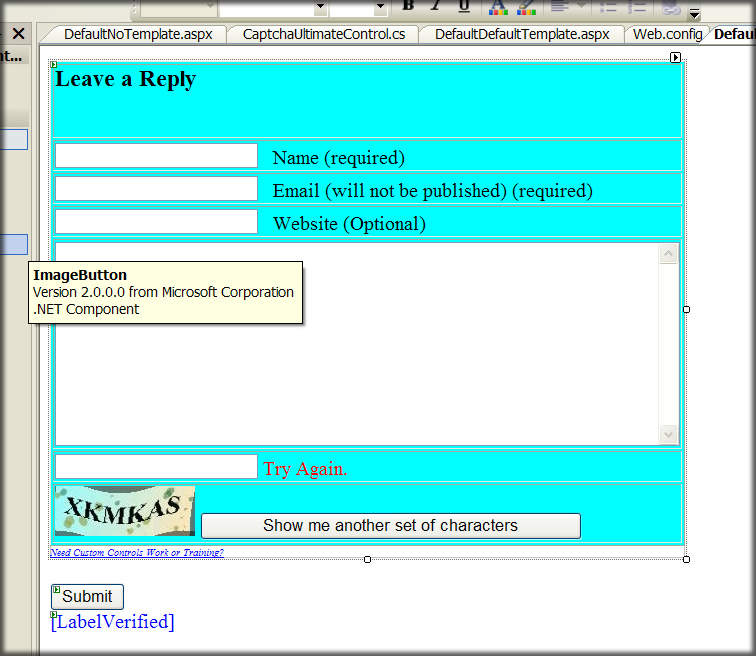
A discussion of templates would not be complete without mentioning the types of things that can be done with templates. Simply converting the default control to a template does not buy you anything. However, by enhancing the template to include things like Name, Email, Website, etc can add a lot of power to the control that would otherwise be difficult to encapsulate. Below is a sample template enhanced (called DefaultCustomTemplate.aspx in the download).
And, the source view of this control is as follows:
<CAPTCHA:CaptchaUltimateControl ID=”CaptchaUltimateControl1″  runat=”server”  ButtonRedisplayCaptchaText=”Generate New Display Number”
    CaptchaBackgroundColor=”White” CaptchaBorder=”1″ CaptchaLength=”4″ CaptchaType=”2″
    CommandArg1=”" CommandArg2=”" CommandArg3=”" CommandArg4=”" CommandArg5=”" EncryptedValue=”"
    FontFamilyString=”Courrier New” HeightCaptchaPixels=”50″ InvalidCaptchaMessage=”Try Again.”
    PlainValue=”" ShowPromo=”True” ShowRecalculateCaptchaButton=”True” ShowTitle=”True”
    Title=”" WidthCaptchaPixels=”140″ OnVerified=”CaptchaUltimateControl1_Verified” OnVerifying=”CaptchaUltimateControl1_Verifying”>
    <ItemTemplate>
        <table bgcolor=”Aqua” border=”1″>
            <tr>
                <td colspan=”2″ style=”text-align: left;”>
                    <h3>
                        Leave a Reply</h3>
                    <br />
                </td>
            </tr>
            <tr>
                <td colspan=”2″>
                    <asp:TextBox ID=”TextBoxAuthor” runat=”server”></asp:TextBox>
                    <literal>  Name (required)</literal>
                    <br />
                </td>
            </tr>
            <tr>
                <td>
                    <asp:TextBox ID=”TextBoxEmail” runat=”server”></asp:TextBox>
                    <literal>  Email (will not be published) (required)</literal>
                    <br />
                </td>
            </tr>
            <tr>
                <td colspan=”2″>
                    <asp:TextBox ID=”TextBoxWebsite” runat=”server”></asp:TextBox>
                    <literal>  Website (Optional)</literal>
                    <br />
                </td>
            </tr>
            <tr>
                <td colspan=”2″>
                    <asp:TextBox ID=”TextBoxComment” TextMode=”multiLine” Rows=”10″ Columns=”60″ runat=”server”></asp:TextBox>
                </td>
            </tr>
            <tr>
                <td colspan=”2″ style=”text-align: left;”>
                    <asp:TextBox ID=”VerificationID” Style=”text-align: left;” runat=”server”></asp:TextBox>
                    <asp:CustomValidator ID=”CustomValidatorID” runat=”server”>Try Again.</asp:CustomValidator>
                    <asp:Label ID=”TitleID” Style=”text-align: right;” runat=”server”> </asp:Label>
                </td>
            </tr>
            <tr>
                <td colspan=”2″ style=”text-align: left;”>
                    <asp:Image ID=”CaptchaImageID” runat=”server” ImageUrl=”~/CaptchaType.ashx” />
                    <asp:Button ID=”ButtonDisplayNextID” runat=”server” Text=”Show me another set of characters” />
                </td>
            </tr>
        </table>
    </ItemTemplate>
</CAPTCHA:CaptchaUltimateControl>
Now that you have the control, the obvious thing to wonder is how to easily use it. For that, you really need event processing. That is what is discussed in the next section.
Event Handling
So, why do we need event handling? Well, I can think of two reasons. The first reason is to allow the CAPTCHA processing to be ignored, say in the case where an already authorized user is running the application, and second so that you can do something when a correct CAPTCHA is verified.
Lets take a look at both cases together for brevity. First thing you want to do is select the Custom CAPTCHA server control in the design mode, right click on properties, then switch the property viewer to events. You will see two events that can be programmed. They are as below, Verified, and Verifying.
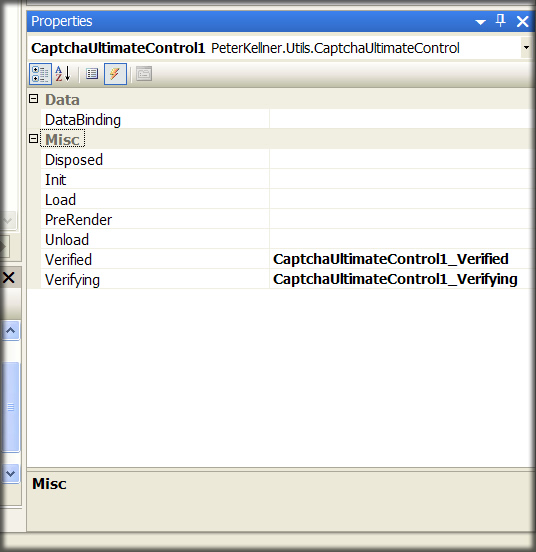
Just like the login control suppled with ASP.NET 2.0 (no coincidence), Verified is called after a correct CAPTCHA is processed, and Verifying is called just before the verify operation takes place. In the Verifying event (as shown below) you can override the event parameter ForceVerify to be true and say for example you check to see if the current user had admin rights, you could force the verify to succeed regardless of what the user typed into the text field. In the Verified event, you can do all sorts of things including capture information that was typed into template fields, and even redirect the user to a different page if that is what you want. Below is the complete codebehind page to show examples of this.
public partial class DefaultCustomTemplate : System.Web.UI.Page {<span class="kwrd">private</span> <span class="kwrd">string</span> captchaConfirmed = <span class="kwrd">string</span>.Empty; <span class="kwrd">private</span> <span class="kwrd">void</span> Page_PreRenderComplete(<span class="kwrd">object</span> sender, EventArgs e) { LabelVerified.Text = <span class="kwrd">this</span>.captchaConfirmed; } <span class="kwrd">protected</span> <span class="kwrd">void</span> CaptchaUltimateControl1_Verified(<span class="kwrd">object</span> sender, EventArgs e) { CaptchaUltimateControl captchaUltimateControl = (CaptchaUltimateControl)sender; TextBox textBoxAuthor = (TextBox)captchaUltimateControl.FindControl(“TextBoxAuthor”); <span class="kwrd">this</span>.captchaConfirmed = “CAPTCHA Confirmed Event Called with Author “ + textBoxAuthor.Text + “.”; } <span class="kwrd">protected</span> <span class="kwrd">void</span> CaptchaUltimateControl1_Verifying(<span class="kwrd">object</span> sender, VerifyingEventArgs e) { e.ForceVerify = <span class="kwrd">true</span>; <span class="kwrd">this</span>.captchaConfirmed = <span class="kwrd">string</span>.Empty; }}
Summary and Conclusions
In this first part of a series of articles (not written at the time of this first publication), we showed how to use the UltimateCaptchaControl. Currently, on the internet, you can find many CAPTCHA controls written for ASP.NET 2.0. None I could find have so much richness to be useful without a lot of modifications. I've attempted to make this control something you can actually use right away with no changes. The source is of course provided for both study and modifications so you can make changes if you see fit.
The plan for the rest of the series to break down the control into its intrinsic parts and explain those parts piece by piece. Building the control uncovered a lot of areas that are very interesting in the ASP.NET 2.0 environment. Feel free to contact me if you have suggestions for the control or feel you would like something better explained about how it works. I look forward to writing the next several articles on this.
References
Many many sources of information have been combined to create the Ultimate CAPTCHA server control. I'd like to briefly mention some of the sources that ideas and code were borrowed from (in no particular order).
Jason Diamond - Jason actually wrote the skeleton code of the designer portion of the control. Converting to and from a template is far from obvious and I could not glean how to do this on my own. Jason was huge help in contributing this.
Scott Mitchell - After many hours of wondering why templates were not working, it occured to me (after using reflector) that the controls in template were hierarchical and not linear. To parse all the controls, I used a short (but clever and recursive class) that Scott Mitchell published. In addition, Scott's prolific writing has been helpful in many ways.
Shanku Niyogi - Author of the Blog Starter Kit at Microsoft, Shanku published some very nice code for generating a CAPTCHA image including generating random bubbles on the image. Very nice touch! His code is what creates the Type2 CAPTCHA images
Mike Hall - Mike Hall, AKA BrainJar published work in 2004 on generating CAPTCHA images in asp.net. It was his work that the CAPTCHA type one presented here is derived from
Jeff Atwood - Jeff took Mike Hall's work and extended to be a custom server control. It is from that work that I built the framework of a server control displaying a CAPTCHA image. A very clean implementation. (that hopefully I didn't over complicate too much)