Also published on Microsoft's MSDN Network at http://msdn2.microsoft.com/en-us/library/aa478947.aspx
Click Here for Source Code Associated With This Article
Applies to:
- Microsoft ASP.NET 2.0
- Microsoft Visual Studio 2005
- Microsoft Internet Information Services
Link To Part 1: Security and Configuration
Contents
Introduction
Technologies Used
The Application and Project
The ObjectDataSource in Detail
The Return Value of the Select Method (Type Collection)
The Select Method Itself
The Custom Sort Criteria
ObjectDataSource In GridView (Data Control)
Conclusion
Introduction
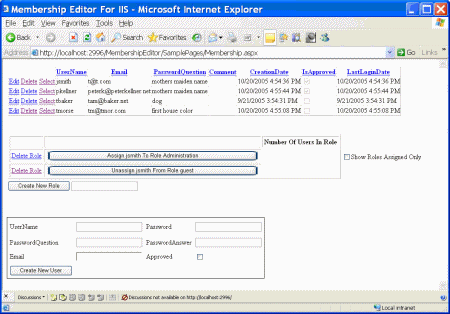
Figure 1. Membership Editor
With the release of Microsoft Visual Studio 2005, there is no "out of the box" solution for maintaining the Membership and Role databases in Microsoft IIS. This is a problem when you move your application from development to a production IIS server. The utility that Microsoft provides, ASP.NET Web Configuration, can be run only in a development, non-production environment. This article and its associated code solve this by implementing a three-tier solution to Member and Role management while using standard Microsoft ASP.NET tools. This means that it will run in any ASP.NET 2.0 environment, including IIS. The solution is flexible and very easy to add to any existing ASP.NET 2.0 website project.
The tiers of this solution are defined as follows. The first tier, the ASP.NET page (also known as the presentation layer), interfaces with two business objects through the object data source. These business objects function as the middle tier, and they are wrappers for members and roles. The third tier, or back end, consists of the Membership and Role Manager APIs provided by ASP.NET. The middle tier objects can easily be dropped into any ASP.NET 2.0 project and used directly, with almost no changes.
This article explains in depth the implementation of the middle tier—that is, the data objects, as well as the ObjectDataSource that is associated with them. It then explains how to use these objects in an ASP.NET Web project that uses Microsoft SQL Server Express 2005, which comes bundled with Visual Studio 2005. However, the Membership API provided by Microsoft uses their provider technology; therefore, the solution presented here is database independent. Membership and role information could just as easily come from LDAP, SQL Server, or Oracle.
Technologies Used
The ObjectDataSource
There are two ObjectDataSource instances defined. One is for Membership Data (User Names, Creation Date, Approval, and so on), and the other is for Roles (Administrator, Friends, and so on). Both of these data sources are completely populated with all of the data access methods—that is, they both have Member functions that perform inserts, updates, deletes, and selects. Both ObjectDataSource instances return a Generic List type, which means that in the GridView, the column names are automatically set to the property value names of the ObjectDataSource. In addition, custom sorting is implemented so that users can click the column headers in the GridView in order to sort the data forwards or backwards, as desired.
SQL Server Express 2005 and Web.Config
The data provider source for the Membership and Role databases is SQL Server Express 2005. The appropriate entries are set in the web.config file in order to make this happen. A short discussion is given later in this article of how to set up a new project from scratch. The connection string for SQL Server Express 2005 is not mentioned in the web.config file, because it is already defined in the Machine.Config file that is included as a default part of the Microsoft .NET 2.0 Framework.
IIS (5.1 and 6.0) Compatible
The Web server can be either version 5.1 or 6.0. In order to do any testing of multiple users logged in to your Web app, you must use IIS. The built-in development Web server does not correctly maintain state of the different users who are logged in. Although the Asp.net Web config tool could be made to work with IIS, the additional security work necessary in order to enable this was not done.
The GridView Control
The GridView is used to present the data for both membership and roles. As mentioned earlier, because of the use of a Generic type for the ObjectDataSource, the column names of the GridView are automatically named after the property values of the ObjectDataSource. Without the use of Generics, the column names revert to meaningless default values and must each be edited by hand.
The Application and Project
The project necessary in order to run this utility is very simple and self-contained. The project files, which are available for download, contain a full working example. Because there is no direct database access to the users and roles, all that is needed is to grab the three data objects (MembershipDataObject.cs, MembershipUserSortable.cs and RoleDataObject.cs: see Figure 2).
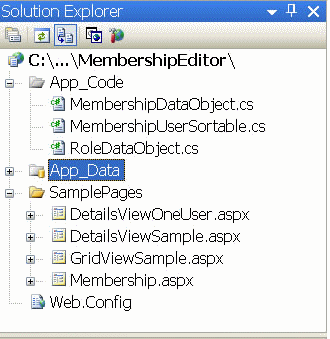
Figure 2. Membership Editor project
In the SamplePages folder there are several other samples that demonstrate the use of the previously mentioned modules. As one example, Membership.aspx is the example shown in Figure 1. It can be used for selecting, updating, inserting, and deleting Members and Roles, as well as for assigning roles to members.
With a working ASP.NET 2.0 application that already has a working membership module, these pages should need no external configuration beyond what has already been done. These files can be copied directly into a project and they will just work.
If this is the first implementation of Membership and Role Management in an application, the process to follow to create a solution using these objects is as follows:
- Using Visual Studio 2005, create a new Web project of the type ASP.NET Web Site.
- Click Website / ASP.NET Configuration on the menu.
- Follow the wizard steps (1 to 7) to create some sample users and roles. This will effectively create a valid web.config file in the current project that has enough information to have Member Management up and running. By default, it will use SQL Server Express 2005 in its default configuration.
- Include the three .cs files in the project, and then include the sample .aspx pages as samples.
The ObjectDataSource in Detail
The ObjectDataSource technology enables the creation of a datasource that behaves very similarly to the SqlDataSource—that is, it exposes interfaces that allow for selecting, updating, inserting, and deleting records (or record-like objects) from a persistent data store (such as a database). The next several sections of this article will discuss the object (or class file) that the ObjectDataSource uses to manipulate membership. Its name in the project is MembershipUserODS.cs.
The Class (MembershipUserODS)
Because the data is retrieved from the Microsoft Membership API, an ObjectDataSource is used to solve the problem. The first step in doing this is to create a stand-alone class that wraps MembershipUser so that it can be associated with the ObjectDataSource. The example below shows a typical set of methods that need to be implemented, and the next several sections of this article will discuss the implementation of each member function. Many of the details are left out of the article, but they are included in the source code provided with this article.
[DataObject(true) public class MembershipUserWrapper { [DataObjectMethod(DataObjectMethodType.Select, true)] static public Collection<membershipuserwrapper> GetMembers(string sortData) { return GetMembers(true, true, null, sortData); }[DataObjectMethod(DataObjectMethodType.Insert, true)] static public void Insert(string UserName, bool isApproved, string comment, DateTime lastLockoutDate, …) { }
[DataObjectMethod(DataObjectMethodType.Delete, true)] static public void Delete(object UserName, string Original_UserName){ Membership.DeleteUser(Original_UserName, true); }
[DataObjectMethod(DataObjectMethodType.Update, true)] static public void Update(string original_UserName,string email,…){ } } </membershipuserwrapper>
The Class Declaration
The class declaration shown above is special because of the attribute [(DataObject(true)]. This attribute tells the the Visual Studio 2005 ObjectDataSource Creation Wizard to look only for members with this special attribute when searching for DataObjects in the data class. See the example in the section showing where this class is assigned to a GridView component.
The Insert Method
The details of each section involve a very straightforward use of the Membership API provided by Microsoft. For example, here is what might be a typical Insert method in more detail.
[DataObjectMethod(DataObjectMethodType.Insert,true)]
static public void Insert(string userName, string password,)
{
   MembershipCreateStatus status;
      Membership.CreateUser(userName, password,);
}
This class Insert is polymorphic, which means there can be multiple Insert methods used for different purposes. For example, it may be necessary to dynamically decide whether a created user should be approved depending on the circumstances. For example, a new user created in an admin screen may want to create users defaulted to approved, whereas a user register screen might default to not approved. To do this, another Insert method is needed, with an additional parameter. Here is what an Insert method that would achieve this goal might look like.
[DataObjectMethod(DataObjectMethodType.Insert,false)]
static public void Insert(string userName, string password, bool isApproved)
{
MembershipCreateStatus status;
   Membership.CreateUser(UserName, password,
      isApproved, out status);
}
As with the other methods listed here, the examples shown are not what will actually be found in the accompanying source. The examples here are meant to be illustrations of typical uses. More complete and commented uses are included in the source.
The Update Method
The Update method is a very straightforward implementation of the Membership API. Just like the Insert method, there can be multiple implementations of Update. Only one implementation is shown here. In the code available for download, there are more polymorphic implementations of Update, including one that just sets the IsApproved property (shown in the following example).
[DataObjectMethod(DataObjectMethodType.Update,false)]
static public void Update(string UserName,bool isApproved)
{
   bool dirtyFlag = false;
   MembershipUser mu = Membership.GetUser(UserName);
   if (mu.isApproved != isApproved)
   {
      dirtyFlag = true;
      mu.IsApproved = isApproved;
   }
   if (dirtyFlag == true)
   {
      Membership.UpdateUser(mu);
   }
}
The Delete Method
The Delete method is the simplest, and it takes one parameters, UserName.
<h2>The Delete Method</h2>
static public void Delete(string UserName)
{
   Membership.DeleteUser(UserName,true);
}
The Select Method with a Sort Attribute
The Select method—GetMembers, in this case—has multiple components, each of them worthy of discussion. First, what it returns is discussed, and then the actual method itself, and finally, how it sorts what it returns.
The Return Value of the Select Method (Type Collection)
The return value of the Select method (which also is referred to as Get) is a Generic Collection class. Generics are used because the ObjectDataSource ultimately associated with the class uses reflection to determine the column names and types. These names and types are associated with each row of data that is returned. This is the same way that a SqlDataSource uses the database metadata of a table or stored procedure to determine the column names of each row. Since the return type of the Select method is MembershipUserWrapper, which inherits from MembershipUser, most of the properties of this class are the same properties that are associated with MembershipUser. Those properties include:
- ProviderUserKey
- UserName
- LastLockoutDate
- CreationDate
- PasswordQuestion
- LastActivityDate
- ProviderName
- IsLockedOut
- LastLoginDate
- IsOnline
- LastPasswordChangedDate
- Comment
Jumping ahead of ourselves a little, one very nice feature of property values is that they can be Read-only (no set method), Write-only (no read method), and of course, Read/Write. The ObjectDataSource Wizard recognizes this and builds the appropriate parameters so that when the datacontrol is rendered (using the ObjectDataSource), just the fields that are updatable (read/write) are enabled for editing. This means that you can not change the UserName property, for example. If this does not make sense now, it will later, when we discuss the ObjectDataSource and the data components in more detail.
The Select Method Itself
Just like Insert and Update, the Select method is polymorphic. There can be as many different Select methods as there are different scenarios. For example, it may be desiable to use the Select method to select users based on whether they are approved, not approved, or both. Typically, there is one Get method that has the most possible parameters associated with it, and the other Get methods call it. In our case, there are three Get methods: one to retrieve all records, one to retrieve based on approval, and one to retrieve an individual record based on a select string. In the following example, the method that returns all users is being called. By setting both Booleans to true, all users will be returned.
[DataObjectMethod(DataObjectMethodType.Select, true)]
static public List<membershipdata> GetMembers(string sortData)
{
   return GetMembers(true,true,null,null);
}
</membershipdata>
The next example shows a more detailed Get method. This example shows only the beginning of the method. The details of the method not shown include finishing the property assignments, filtering for approval status and rejecting the records not meeting the criteria, and applying the sort criteria. Following this example is more discussion about the sort criteria. (Note that calling GetAllUsers on a database with more than a few hundred users [the low hundreds] is quickly going to become an expensive operation.)
[DataObjectMethod(DataObjectMethodType.Select, true)]
static public List<membershipdata> GetMembers(bool AllApprUsers,
    bool AllNotApprUsers, string UserToFind, string sortData)
{
   List</membershipdata><membershipdata> memberList = new List</membershipdata><membershipdata>();
   MembershipUserCollection muc = Membership.GetAllUsers();
   foreach (MembershipUser mu in muc)
   {
      MembershipData md = new MembershipData();
      md.Comment = mu.Comment;
      md.CreationDate = mu.CreationDate;
</membershipdata>
The Custom Sort Criteria
Notice that, in the preceding code, a parameter string named sortData is passed into GetMembers. If, in the ObjectDataSource declaration, a SortParameterName is specified as one of its attributes, this parameter will be passed automatically to all Select methods. Its value will be the name specified by the attribute SortExpression in the column of the datacontrol. In our case, the datacontrol is the GridView.
The Comparer method is invoked based on the parameter sortName coming into the GetMembers method. Since these ASP.NET Web pages are stateless, we have to assume that the direction of the current sort (either forward or backwards) is stored in the viewstate. Each call reverses the direction of the previous call. That is, it toggles between forward sort and reverse sort as the user clicks the column header.
Assuming that a GridView is used, the parameter that gets passed into GetMembers(sortData) has in it the data from the SortExpression attribute of the GridView column. If a request for sorting backwards is being made, the word "DESC" is appended to the end of the sort string. So, for example, the first time the user clicks on the column Email, the sortData passed into GetMembers is "Email." The second time the user clicks on that column, the parameter sortData becomes "Email DESC," then "Email," then "Email DESC," and so on. As a special note, the first time the page is loaded, the sortData parameter is passed in as a zero-length string (not null). Below is the guts of the GetMembers method that retrieves and sorts the data so that it is returned in the correct order.
[DataObjectMethod(DataObjectMethodType.Select, true)] static public List<membershipdata> GetMembers(string sortData) { List</membershipdata><membershipdata> memberList = new List</membershipdata><membershipdata>(); MembershipUserCollection muc = Membership.GetAllUsers(); List<membershipuser> memberList = new List</membershipuser><membershipuser>(muc);foreach (MembershipUser mu in muc) { MembershipData md = new MembershipData(mu); memberList.Add(md); }
… Code that implements Comparison
� memberList.Sort(comparison);
return memberList; } </membershipuser></membershipdata>
In the next section, when this is incorporated into a GridView, it will become more clear.
The ObjectDataSource Declaration
The easiest way to declare an ObjectDataSource is to drag and drop one from the datacontrols on the toolbar, after first creating an empty ASP.NET page with the Visual Studio 2005 wizard. After creating the ObjectDataSource, a little tag in the upper-right corner of the newly created ObjectDataSource can be grabbed; then, clicking Configure Data Source opens a wizard saying "Configure Data Source—ObjectDataSource1" (see Figure 3).
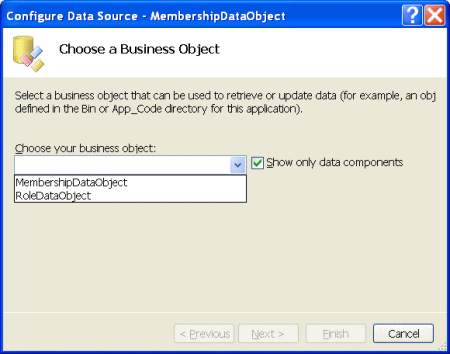
Figure 3. Configuring ObjectDataSource
At this point, two classes that are available for associating with an ObjectDataSource will be seen. MembershipUserODS is the primary subject of this article. RoleDataObject is basically the same thing, but it encapsulates Membership Roles. Also, remember that what is shown here are just the objects that are declared with the special class attribute [DataObject(true)] that was described in "The Class Definition."
After choosing MembershipUserODS, a dialog box with four tabs appears. The methods to be called from the MembershipUserODS class will be defined on these tabs. Methods for Select, Update, Insert, and Delete will be associated with member functions in the MembershipUserODS. In many cases, there will be multiple methods available in the class for each of these. The appropriate one must be chosen, based on the data scenario desired. All four tabs are shown in Figure 4. By default, the members that are marked with the special attribute [DataObjectMethod(DataObjectMethodType.Select, false)] will be populated on the tabs. Of course, however, this particular attribute is the default for Select. Changing the expression DataObjectMethodType.Select to DataObjectMethodType.Insert, DataObjectMethodType.Update, and DataObjectMethodType.Delete will make the defaults appropriate for the different tabs. The second parameter, a Boolean, signifies that this method (remembering that it may be defined polymorphically) is the default method, and that it should be used in the tab control.
The Select Method
As mentioned earlier, in the section describing the MembershipUserODS class, the GetMembers function returns a Generic Collection class. This enables the ObjectDataSourceMembershipUser control defined here to use reflection and ascertain the calling parameters associated with this GetMembers call. In this case, the parameters used to call GetMembers are returnAllApprovedUsers, returnAllNotApprovedUsers, userNameToFind, and sortData. Based on this, the actual definition of the new ObjectDataSource will be as follows.
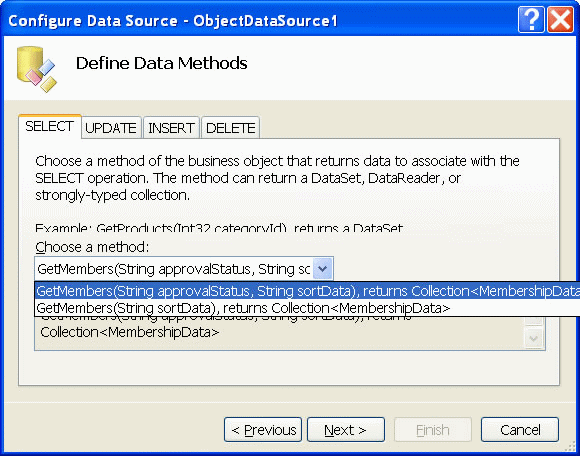
Figure 4. Assigning the Select method
<asp :ObjectDataSource ID="ObjectDataSourceMembershipUser"runat="server"
    SelectMethod="GetMembers"UpdateMethod="GetMembers"
    SortParameterName="SortData"
    TypeName="MembershipUtilities.MembershipDataObject"
    DeleteMethod="Delete" InsertMethod="Insert">
    <insertparameters>
        <asp :Parameter Name="userName" Type="String" />
        <asp :Parameter Name="password" Type="String" />
        <asp :Parameter Name="isApproved" Type="Boolean" />
    </insertparameters>
</asp>
The Insert Method
The Insert method, in this case, is assigned to the member function Insert(). Notice that this method is called with only two parameters: UserName and Password (see Figure 5). The number of parameters must equal the number of parameters declared in the ObjectDataSource. The parameter declaration from the ObjectDataSource is shown below. There is a second Insert Member function defined that adds a third parameter: approvalStatus. If the functionality of this ObjectDataSource is to include inserting while setting the approvalStatus, then the other insert method should be chosen from the drop-down list. That would cause the following InsertParameters to be inserted into your .aspx page. If the one with two parameters is chosen, the block would not include the asp:Parameter with the name isApproved in it. Again, keep in mind that this example may not agree with the source code enclosed, and that it is here only as an example. The source enclosed is much more complete.
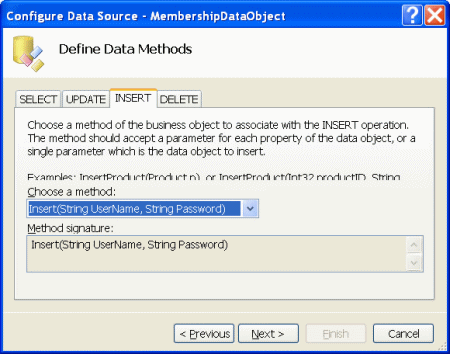
Figure 5. Assigning the Insert method
<asp :ObjectDataSource ID="ObjectDataSourceMembershipUser"runat="server"
    SelectMethod="GetMembers"UpdateMethod="GetMembers"
    SortParameterName="SortData"
    TypeName="MembershipUtilities.MembershipDataObject"
    DeleteMethod="Delete" InsertMethod="Insert">
    <insertparameters>
        <asp :Parameter Name="userName" Type="String" />
        <asp :Parameter Name="password" Type="String" />
        <asp :Parameter Name="isApproved" Type="Boolean" />
    </insertparameters>
    ...
</asp>
Also, keep in mind that using an Insert method with minimal parameters will require a default password to be set in the method. In a production system, this would be a bad idea. See the attached source code for a better example of how to handle inserts. Specifically, see the page Membership.aspx for this functionality.
The Update Method
The Update method, in this case, is assigned to the member function Update(). Notice that this method is called with multiple parameters: UserName, Email, isApproved, and Comment (see Figure 6). In addition, there is another Update method that has all the updatable parameters. This is useful for creating a control that has the most possible update capabilities. Just like Insert, the appropriate Update method is chosen for this ObjectDataSource. When the wizard is finished, it will automatically create UpdateParameters, as shown below.
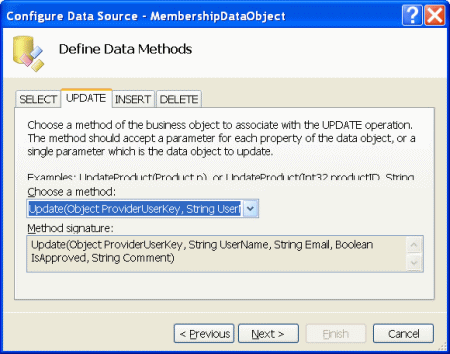
Figure 6. Assigning the Update method
<asp:ObjectDataSource ID="ObjectDataSourceMembershipUser"runat="server"
    SelectMethod="GetMembers" InsertMethod="Insert"
    SortParameterName="SortData"
    TypeName="MembershipUtilities.MembershipUserODS"
    UpdateMethod="Update" DeleteMethod="Delete">
    <updateparameters>
        <asp :Parameter Name="Original_UserName" />
        <asp :Parameter Name="email" Type="String" />
        <asp :Parameter Name="isApproved" Type="Boolean" />
        <asp :Parameter Name="comment" Type="String" />
    </updateparameters>
    ...
    ...
The Delete Method
The Delete method, in this case, is assigned to the member function Delete(). There is, of course, only one Delete method necessary (see Figure 7). Below is the declaration of the ObjectDataSource that supports this Delete method.
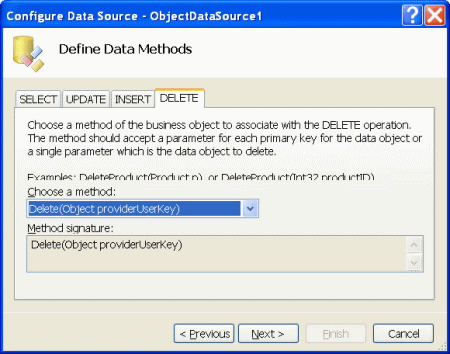
Figure 7. Assigning the Delete method
<asp:ObjectDataSource ID="ObjectDataSource1" runat="server"
    SelectMethod="GetMembers" InsertMethod="Insert"
    SortParameterName="SortData"
    TypeName="MembershipUtilities.MembershipUserODS"
    UpdateMethod="Update" DeleteMethod="Delete">
    <deleteparameters>
        <asp :P arameter Name="UserName" />
        <asp :P arameter Name="Original_UserName" />
    </deleteparameters>
    ...
The Class (RoleDataObject)
Just like Membership, Roles are set up with their own DataObject. Since there is nothing special about Roles, there are no details regarding their setup in this article. An understanding of how the Membership DataObjects are set up is transferable to how Roles are set up. In Membership, the Microsoft C# object that encapsulates the Membership API is MembershipDataObject.cs. The analogous class for encapsulating the Role API is RoleDataObject.cs.
ObjectDataSource In GridView (Data Control)
Class declarations for Membership Users and Roles have been established in the previous sections of this article. Also, a complete ObjectDataSource object has been placed on an ASP.NET page. The final step is to create the user interface, also known as the user-facing tier of the application or the presentation layer. Because so much of the work is done by the objects created, all that is necessary is to create a simple GridView and associate it with the ObjectDataSource. The steps are as follows:
- In visual mode of the ASP.NET page designer, drag and drop the GridView data component onto the page associated with the ObjectDataSource created earlier.
- Enable selecting, deleting, updating, inserting, and sorting.
Figure 8 shows the dialog box associated with configuring the Gridview.
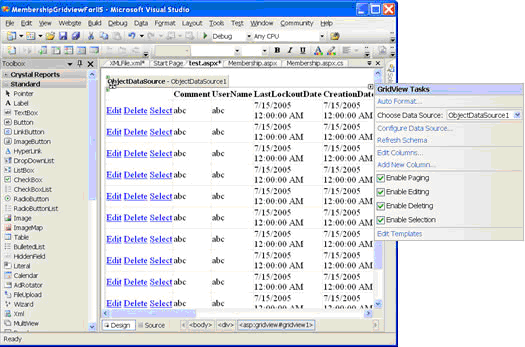
Figure 8. Configuring GridView
A special mention should be made here that DataKeyNames in the GridView control shown below is automatically set. This is because the primary key has been tagged in the MembershipUserSortable class with the attribute [DataObjectField(true)], as shown below. Notice also that since UserName is a property of the MembershipUser class, it was necessary to provide a default property in the class extending MembershipUser. Since this is a Read-only property, only a Get method is declared. (UserName is public virtual on MembershipUser.)
[DataObjectField(true)]
public override string UserName {
  get { return base.UserName;
}
There is one attribute in the GridView that must be set by hand: the primary key must be set in the control. To do this, associate the attribute DataKeyName with UserName. The GridView declaration is shown below.
<asp:GridView ID="GridView1" DataKeyNames="UserName" runat="server"
        AllowPaging="True" AutoGenerateColumns="False"
        DataSourceID="ObjectDataSourceMembershipUser"
        AllowSorting="True">
    <Columns>
    ...
    ...
Conclusion
To wrap things up, you should now be familiar with how to build your own three-tier architected ASP.NET application. In addition, you now have two objects that you can freely use that encapsulate Members and Roles. You could now, for example, use the DetailView control, and in only a few minutes build a complete DetailView interface to Members that performs Navigation, Inserting, Updating, and Deleting of Members. Give it a try!
I have specifically not gone into the implementations of adding, updating, and deleting Members or Roles. If you look at the source code, you will find that I have used the APIs in a very straightforward way. Not much will be gained by describing those calls in much detail here, because I'm sure that if you are still reading this, you, like me, are probably learning this material as you go.
I was fortunate enough to be at MS TechEd in Orlando and PDC in LA this year, and was able to ask many questions of the ASP.NET team. In particular, I would like to thank Brad Millington and Stefan Schackow for putting up with my many questions during those weeks, and Jeff King and Brian Goldfarb for all their help in making this a better article. In some way, this article is payback, so that hopefully they won't have to answer as many questions in the future.
About the author
Peter Kellner founded 73rd Street Associates in 1990, where he successfully delivered systems for university clinic scheduling, insurance company management, and turnkey physician office management to more than 500 customers nationwide. Ten years later, in 2000, 73rd Street Associates was purchased by a large insurance company, and Peter started a new career as an independent software consultant. Among the technologies he currently is involved with are ASP.NET, Oracle, Java, VOiP, and soon, SQL Server. When not working, Peter spends most his free time biking. He has ridden his bike across the globe. Most recently he and his wife, Tammy, rode across the U.S., from California to Georgia, in just 27 days.
His blog site is https://peterkellner.net. You will find this article and the code posted in the download section.
